Table of Contents
You’ve done the hard work: Created a podcast brand, honed your podcast storytelling skills, and recorded captivating content for a target audience. It’s now time to polish your gem. Edit and let it shine!
The truth of the matter is that even with the best podcasting equipment and software, recording a flawless episode is hard, even for seasoned professionals. Podcast audio editing is about transforming your raw recording into a fully-fledged audio experience your listeners will love—and keep coming back for more. It’s your secret weapon, your magic wand.
Then again, editing a podcast can be intimidating (especially for beginners). But you know what’s even scarier? Not editing your podcast! And here’s why…
Podcast listeners are a picky bunch. Most audiences today expect a lot more than an unedited 1-hour conversation.
A survey by The Podcast Host suggests that high-quality audio is a non-negotiable for more than half of your potential podcast listeners. And your competition is likely well aware of this fact, with 97.7% of podcasters rating “producing a quality podcast” as their top priority.
And besides, your B2B podcast is a mirror reflection of your brand. You wouldn’t want your potential clients to perceive you as unprofessional, would you?
Never underestimate the significance of knowing your way around podcast audio editing software or having a professional audio engineer in your corner.
We know the stakes are high. No pressure, though. Podcast audio editing is what we do; we eat this for breakfast—and we’ll show you exactly how to edit podcasts.
Whether you’re a beginner or you want to sharpen your skills, learn the best practices on how to edit a podcast your listeners will love.
This post is the 13th in a series of “Podcasting Mastered” chapters designed to help you launch and grow an enterprise lead-generating podcast.
There has never been a better time to make your voice heard – and we’re here to help master the art of podcasting with step-by-step guides.
Get the new chapters sent directly to your inbox, as soon as they release.
We follow strict no-spam policy. Your information will not be sold.
Things to Consider Before Editing a Podcast.

When editing podcasts, experience is the best teacher. Some trial-and-error is inevitable. But you can avoid most of the “errors” with a few proactive tips and tricks.
Plan – Have a Goal in Mind.
Before you lay a finger on your recorded audio, have a goal in mind. Be clear about what you want to accomplish from the editing process. What and why are you editing? How do you picture the final product?
Answering these questions will save you time, effort, and sanity.
For example, if you’re running a business podcast geared towards a professional audience, your editing efforts should center around producing clean audio that brings your key talking points to the forefront. But suppose you’re editing an emotionally-charged podcast. In that case, it might be best to leave room for contemplative questions and preserve vocal cues such as intonation, intensity, and pitch.
Takeaway: Don’t rush into editing a podcast. Have a clear-cut goal—and use it as a guiding compass throughout the process.
Create an Editing Outline.
Got a goal? Great!
Now it’s time to create a plan of action that factors in your overall goal, the target audience, and the subject matter.
Start by carefully listening to your raw recording in its entirety. Consider using the “Punch List” technique, where you note down editing points with corresponding timestamps. This serves as a podcast audio editing outline that gives you a picture of what to edit and where.
Your editing outline could be something like this:
- 00:20 – Edit computer fan noise
- 01:30-02:13 – Cut repetitive conversation
- 11:11 – Edit guest cough
- 30:20-30:25 – Prolonged pause
Organize Your Audio Files.
You’re better off having your socks neatly tucked away in a designated spot rather than digging into a pile of clothes every morning, right? The same applies to your audio files.
When starting out, you’d probably get away with a little disorderliness and digital clutter. But as you churn out more and more episodes, organizing your podcast files will prove invaluable.
Our tips?
- Create a standardized system with consistent file naming conventions and folder structures.
- Differentiate sound editing from content editing. Focus your attention on one task at a time to optimize efficiency.
- Use separate tracks in your DAW (Digital Audio Workstation) for different types of audio files—and name/group them accordingly.
Assemble Your Tools for Editing Podcasts.
There are tons of podcast audio editing software out there today. But they mostly fall into 2 major categories: DAWs and Audio Editors.
And while you might come across people describing the two types of podcast editing software interchangeably, they are not the same.
DAWs such as Adobe Audition or GarageBand have multi-track capabilities, which means you can work on multiple clips simultaneously. They also support non-destructive editing by preserving the source file.
In contrast, audio editors like Audacity only support one clip at a time and are destructive in that any changes you make are applied to the source file.
Podcast editing software aside, you’ll also want to have decent podcasting headphones at your disposal. Preferably a closed-back, over-ear pair that is comfortable.
How to Edit a Podcast – Step-By-Step Guide.
Thoughtful and careful podcast audio editing can make a huge difference in the quality and reception of your show. It can range from high to low effort, precise to subjective, and technical to creative—depending on your podcast’s goals, style, and content.
Ready to transform your audio from average to truly great? First, let’s differentiate between editing, mixing, and mastering. With modern DAWs, it’s easy to blur the lines between editing, mixing, and processing. But true mastery of podcast editing starts with mastery of the individual parts:
- Audio editing for podcasts is largely about mitigating audible distractions, rearranging your recording to enhance the flow of the dialogue, and applying ‘complementary audio’ (music, transitions, sound effects, etc.).
- Mixing is when you polish inconsistent dynamic ranges, adjust tones and balance audio levels in individual tracks, so they sound equal before merging them into a single stereo track.
- Mastering is about enhancing the final stereo bounce for distribution. It includes limiting, compression, and loudness settings.
This audio editing for podcasts guide is designed to give you a stable foundation by covering the nitty-gritty of these three processes.
We’ll use examples from Adobe Audition—one of the DAW software we use at PodcastBuffs—to help you better understand the process of editing a podcast.
STAGE 1: Noise Reduction

Our first step of the post-production process is all about noise reduction.
Unwanted sounds are bound to creep into your podcast recording. From a car engine rolling by to a podcast speaker adjusting their podcasting mic, background noises are nearly inevitable. It’s part of the trade.
We find it’s a good idea to reduce background noise early on to give the podcast some clarity before editing.
Noise Reduction.
There are plenty of ways to reduce noise in a podcast recording using Adobe Audition.
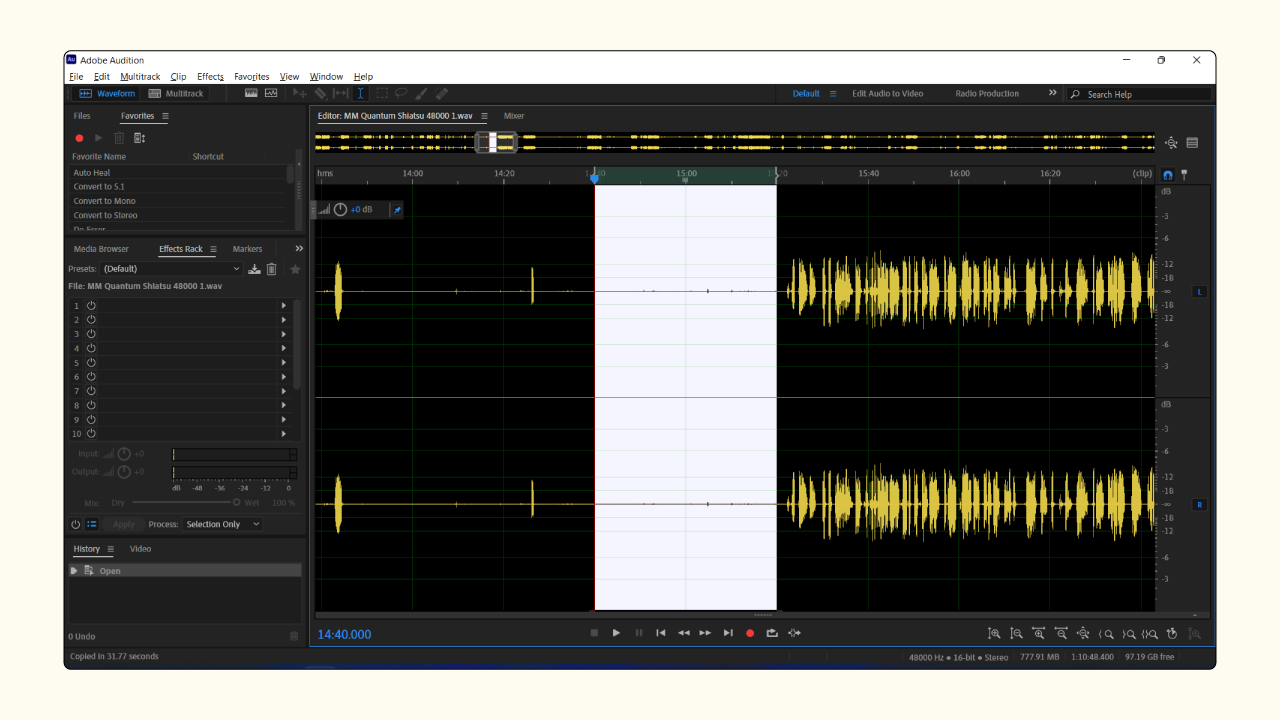
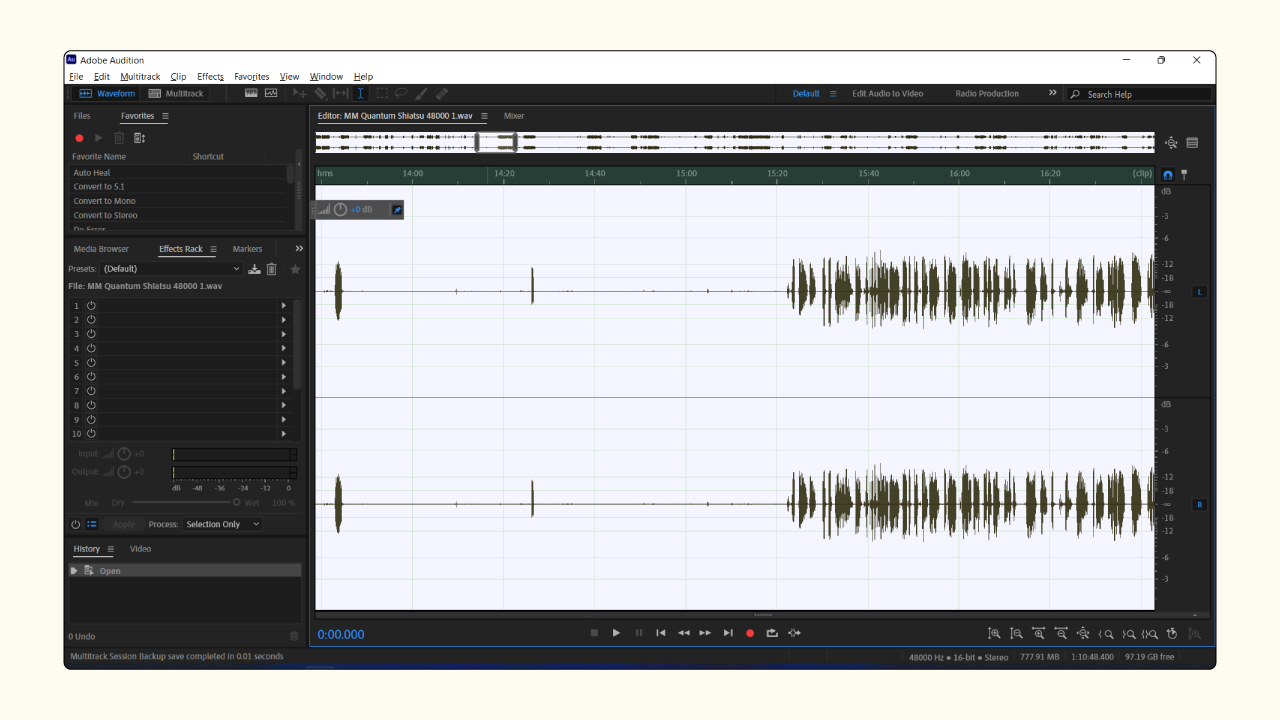
Step 1 – If you have a multi-track session, go to the Waveform Editor by double-clicking on the track. Now “Capture Noise Print” by selecting a noise frame, which should be a range indicating ONLY background noise. The longer the sample, the better the results. The DAW will analyze this noise profile so it can remove it from the rest of the waveform automatically.
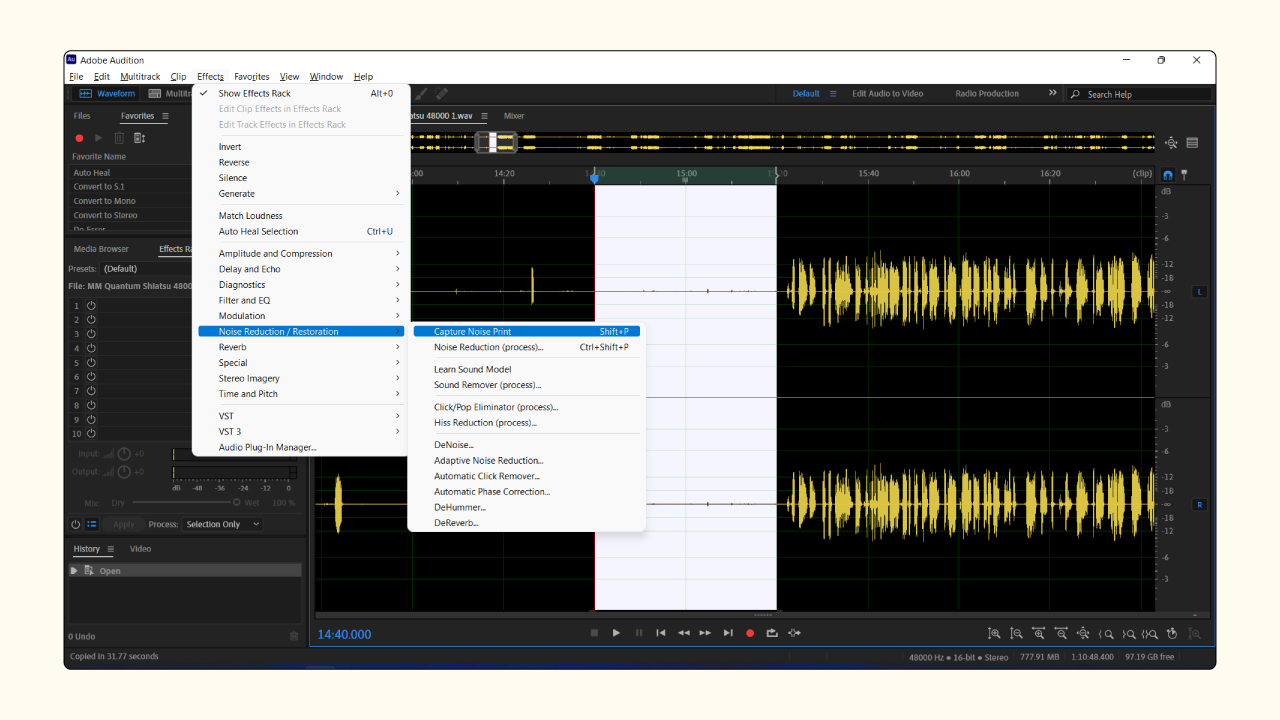
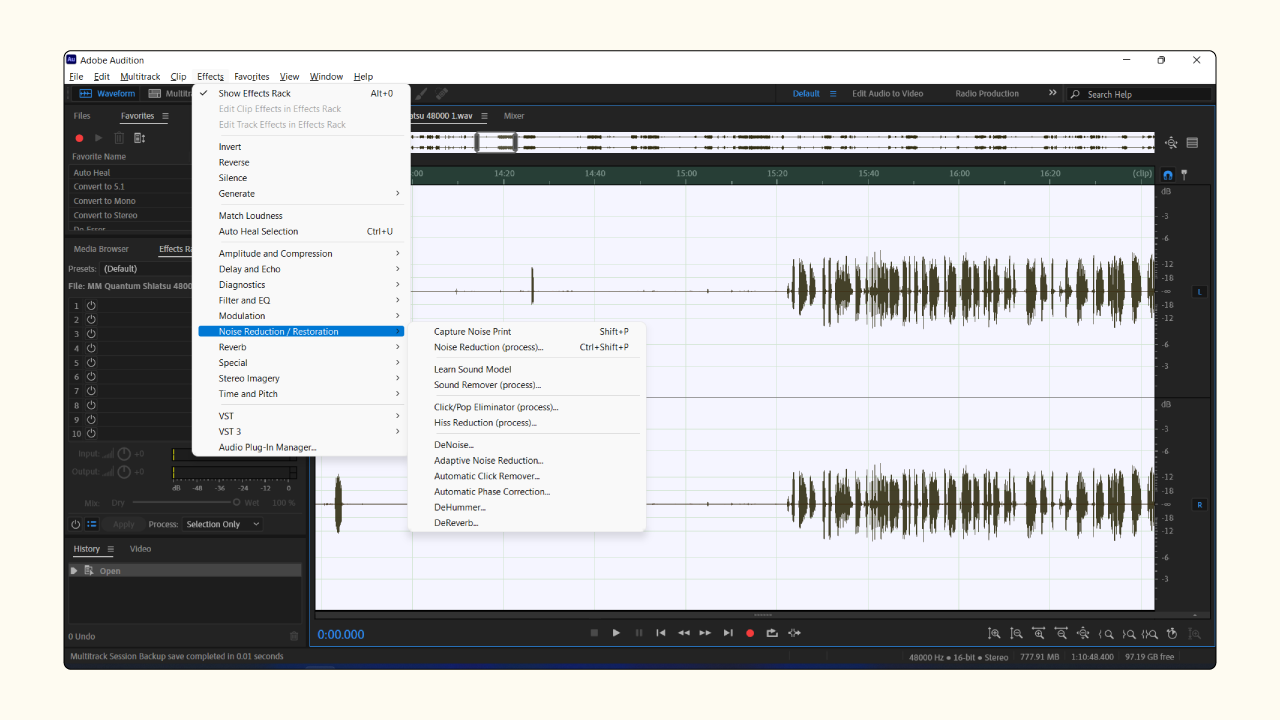
Step 2 – Navigate to Effects > Noise Reduction/Restoration > Capture Noise Print
Step 3 – Back to the Editor panel, select the range you want to remove the noise. This can be the entire audio or a portion.
Step 4 – Next, go to Effects > Noise Reduction/Restoration > Noise Reduction (process)… and apply.
Other useful noise reduction functions in Adobe Audition include:
- DeNoise Effect: Removes background noise from the audio file, including fans and unwanted him and hiss.
- DeReverb Effect: The best way to remove reverb is by installing the right acoustic treatment in your recording studio. But if some reverb manages to sneak into your audio, the DeReverb effect is a nifty tool to adjust the reverberation amount.
- DeHummer Effect: Removes hums from electronics or any other narrow frequency bands.
- Click/Pop Eliminator Effect: Reduces mic crackles, clicks, and pops.
STAGE 2: Dialogue Editing

Dialogue editing is simply playing around with your raw audio to create a compelling story. For this, you may have to cut and move bits and pieces around.
Here are a few contemplative questions to help you figure out what to leave and what to cut out:
Does this add anything to the listener experience?
As we mentioned in the previous lesson on “ How to Record for a Podcast,” the ideal episode length is that which respects your listeners’ time. Your podcast must not be any longer than it should be. Focus on the content that supports a compelling story and cut the rest. Edit out extended pauses, awkward moments, random tangents, run-on sentences, and mispronunciations that don’t have a place in the final product.
How does this sound impact the listener’s attention?
You want to keep the audience engaged. Do away with anything that may distract them from what you want to put across. This could be coughs, annoying ambient sounds, or even participants talking over each other.
On the other hand, preserve background sounds that help immerse the listener into the narrative. For example, a background of birds chirping can add a sense of time and place to a podcast about the great outdoors.
Does the conversation sound natural?
Editing a podcast is all about balance. You can’t deliver raw unedited content to your audience. And they also won’t appreciate an overly-edited conversation. There is a fine line to walk here.
Podcast listeners don’t necessarily want a narrator in their ears. They’re mostly looking for something authentic and more organic. So be careful not to disrupt the natural flow of the conversation.
With these questions in mind, listen to your episode as if you were the target listener and cut out anything unnecessary or distracting.
Pro Tip on Editing a Podcast: Consider editing in real-time as you listen to the raw audio. This may help you maintain the pace of the conversation, giving you an output that sounds less doctored.
Cutting Audio
Cutting audio is one of the most important assets for dialogue editing. Think of it as peeling away the unwanted skin of a fruit to expose the juicy flesh for your listeners to feast on.
Step 1 – Let’s say there’s a random tangent about the weather in your podcast conversation, and you’d like to do away with it. When you open a new session on Adobe Audition, there’s a cut tool with an icon that looks like a razor blade.
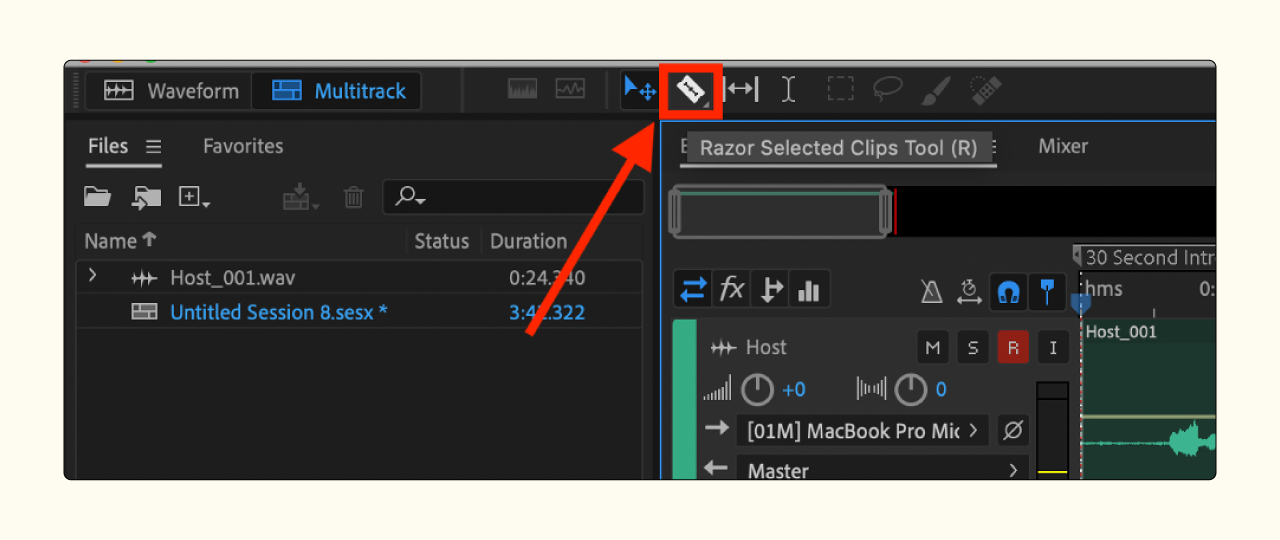
Step 2 – Click on the tool and select the section of the conversation you’d like to remove by applying two cuts on either side.
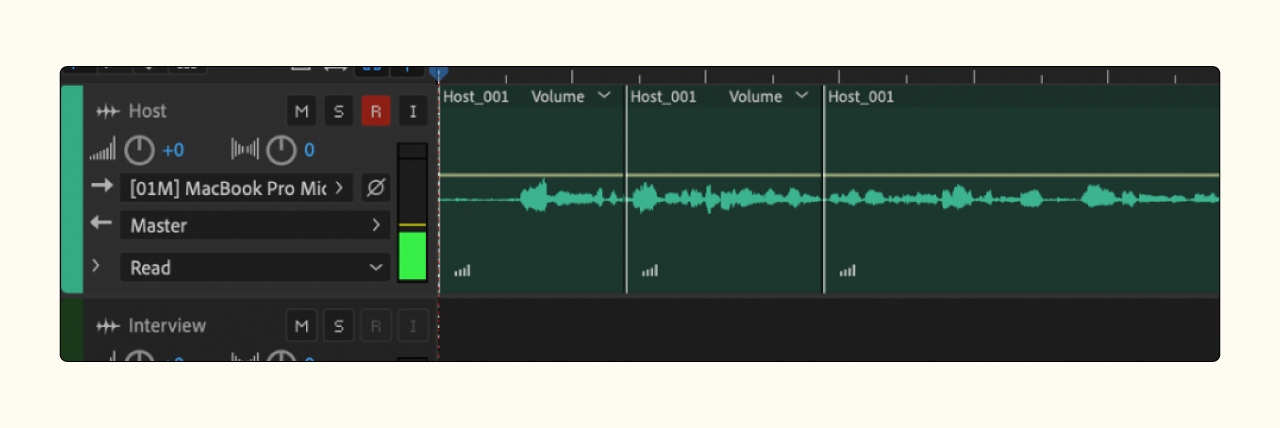
Step 3 – Now switch to the move tool on the left side of your cut tool.

Step 4 – Next, select the bit of conversation you want to remove and click the Delete key on your keyboard. This will leave a gap that you can seal by dragging over the second clip.
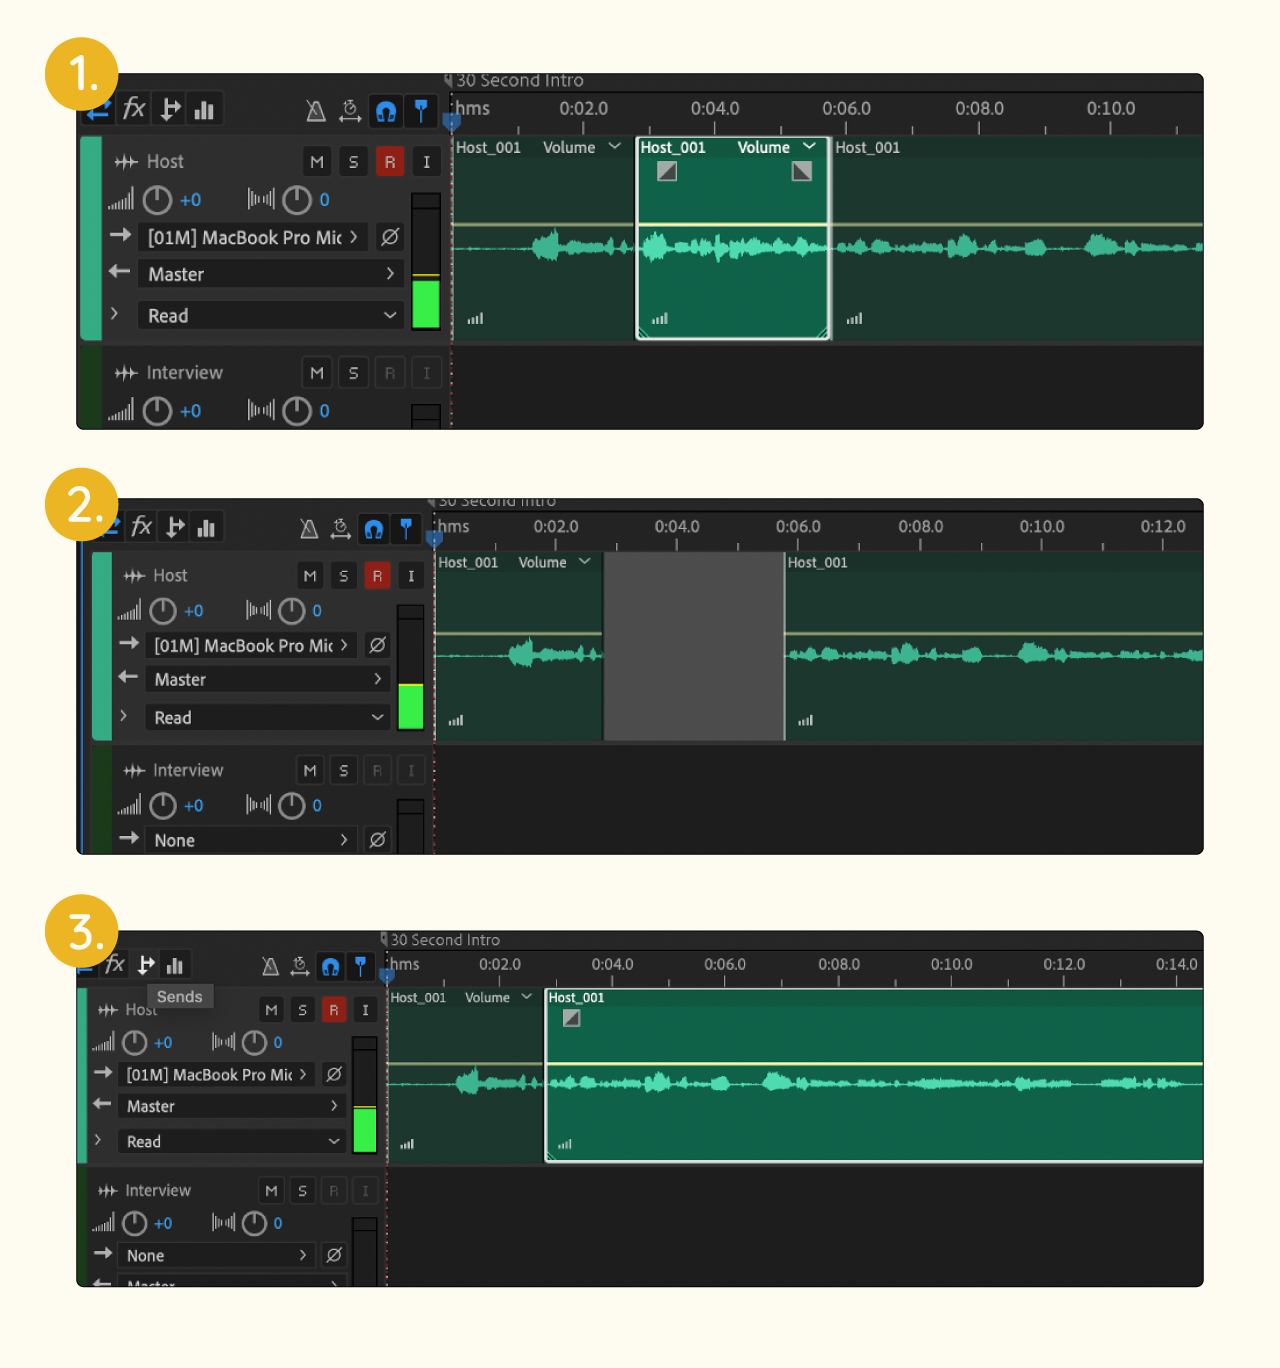
Remember to listen through the section of audio you snipped to ensure you’ve not accidentally cut too little or too much. If you have, and the audio does not flow naturally, undo using the Control/Command + Z hotkey.
Once you’ve edited the dialogue and the ideas make the most of the allotted time, you can place other sound elements to start the podcast mixing process.
Pro Tip on Editing a Podcast: : Take some time to master keyboard shortcuts. It makes your editing faster and more enjoyable.
STAGE 3: Sound Design
Now to spice up your conversation. Sound design focuses on creating an engaging and memorable experience for your listeners through:
- A podcast intro to help grab your listeners’ attention.
- A podcast outro to nudge them to keep listening.
- Leveraging podcast music and sound effects to enhance your storytelling. Think of how suspenseful tracks in horror films amplify your emotions.
Adding Music, Intro, Outro, or Sound Effects.
If you’re looking to supplement your podcast with audio assets such as intro music or sound effects, this tutorial will should exactly how.
Step 1 – Move all audio files to a project-specific folder (remember our earlier tip for staying organized? Well, here’s a scenario of its application). Now import the files to Adobe Audition. They should appear on the top left of your DAW window under the Files panel.
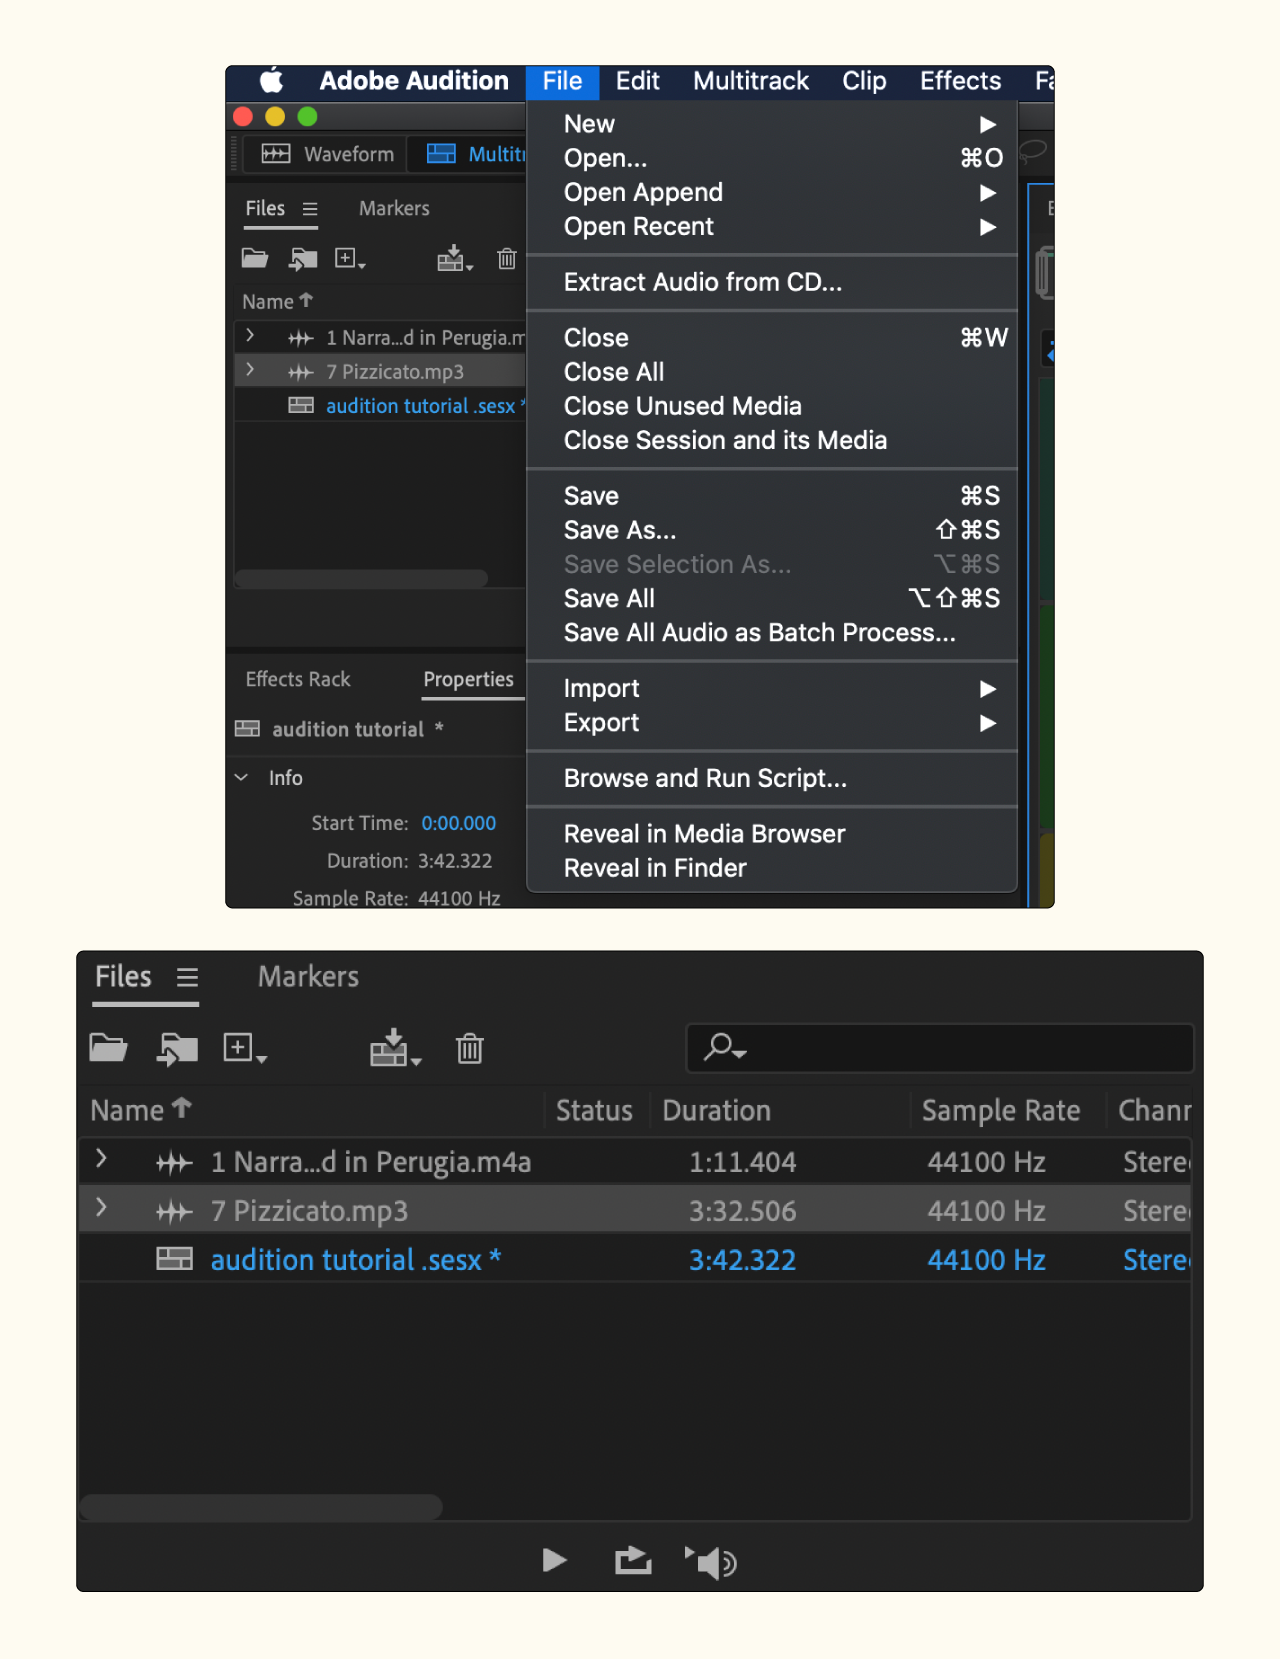
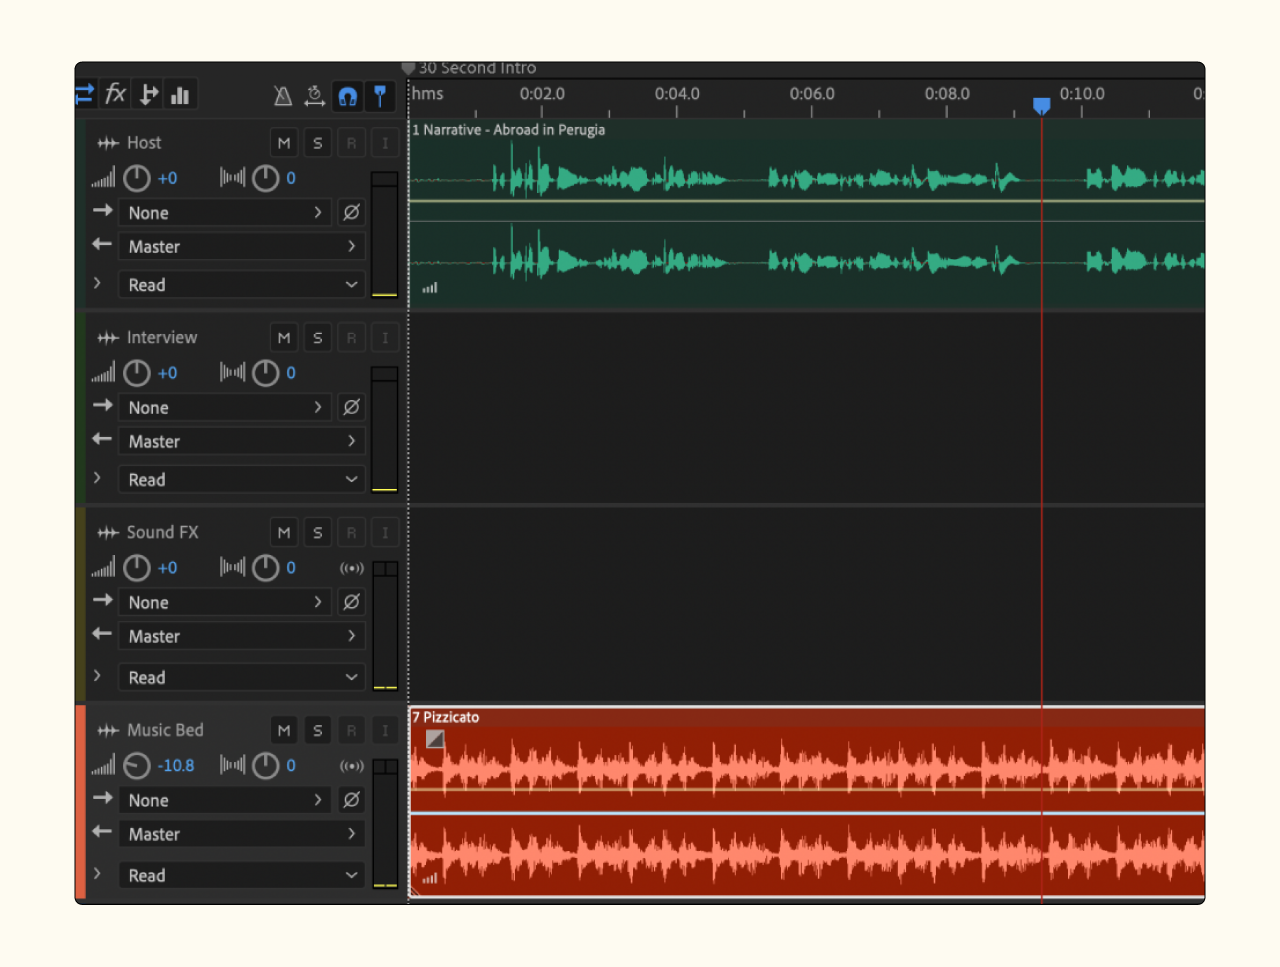
Step 2 – Now click and drag each file into an appropriately named track on your timeline.
Pro Tip on Editing a Podcast: : Use sound effects sparingly. It’s easy to overdo it—and this may leave your audience distracted or even irritated.
STAGE 4: Mixing

Your audience won’t be listening to the multiple vocal and sound clips you have ‘scattered’ on your DAW. You’ll need to blend the different tracks into a cohesive unit—as if they were never separate. This is what we call mixing, in a nutshell.
Effective mixing should tick the following boxes:
Balance frequencies using equalization
Frequency problems are quite common in podcast audio editing. So you might as well familiarize yourself with the equalizer (EQ), especially if you run an interview podcast.
Different guests likely have different mics, and they’re in different environments. This means that you’ll likely have unpleasant frequencies to clean up.
Maintain consistent levels
Wouldn’t you find it unsettling if someone randomly started speaking softly or LOUDLY? Working with multiple tracks means running the risk of unpleasantly fluctuating sound.
A compressor solves this by reducing the dynamic range of the audio. The quietest sounds and the loudest ones move closer together. If a clip is too loud, dial it down. Low? Dial it up. But don’t overdo it!
Seamless fades
From one audio element to another (e.g., transitioning from the intro music to the host’s dialogue).
Make the most of crossfades to ‘smoothen out’ abrupt transitions. Placing spliced clips too close together can be a remedy for abrupt stops and starts. You can use a “dead air” ambiance clip to fade in and out of two audio clips. This facilitates a smooth flow that is easy on the ears and helps keep the listener’s focus.
Pro Tip on Editing a Podcast: : Technical sound processing (compression, equalization, etc.) should always be in service of the content!
STAGE 5: Mastering
Mastering is really just mixing but on the final stereo. The process occurs after you’ve done all the splicing, dropped your music tracks and intros/outros, and balanced everything. It’s like ‘proofreading´ to identify anything that may have slipped under your radar.
Confirm that the story flows seamlessly from the first second to the last and make sure volume levels match up. The audio should be clean, and the conversation should feel as natural as possible. If you like how it sounds, great! Your audience will likely love the delivery too.
Put Your Best Foot (Ear) Forward
Editing a podcast is part of the final stages of the podcast production process. Do justice to all your efforts and make it a good one. Your content won’t matter much with poor podcast quality (at least to most people).
Good podcast audio editing acts as both a Band-Aid to fix recorded mistakes and a catalyst to add some bedazzle to the narrative.
Following the tips covered in this lesson will give you a head start in producing a podcast your audience will love.
And we can’t wait to hear your story!
If you would like to discuss the finer details of editing podcasts, don’t be a stranger. Schedule a call, and let’s talk more about your podcasting journey.
Don’t know where to begin? Get started with our free B2B Podcasting course.
FREE EMAIL COURSE
B2B Podcasting Mastered
Learn how to launch a revenue generating podcast for your business in just 10 minutes a day, for 2 weeks.