This is it! Branding? Check.
Hardware for B2B podcasting? Check.
Podcast recording software? Check.
It’s now time to record your business podcast—and this is where the magic happens. It’s when you put all your planning into action. When you bring everything together to create valuable content for your targeted audience.
Creating the best podcast audio starts in the recording room. And although the right podcast editing service can do miracles, some things are hard to salvage—and listeners won’t sit through inaudible or distracting content.
Sure, there is a lot of pressure to get it right—especially for beginners. But it doesn’t have to be daunting. You can learn how to record for a podcast and produce high-caliber episodes in no time and with minimal challenges.
We will walk you through every single step to ensure your recording goes smoothly. This lesson aims to help you master how to record a podcast like a pro, regardless of your skill level or recording setup.
By the end of this piece, you will be confident enough to get your voice out into the world (where it’s meant to be). Capturing studio-quality audio will be second nature.
Let’s jump right in.
This post is the 11th in a series of “Podcasting Mastered” chapters designed to help you launch and grow an enterprise lead-generating podcast.
There has never been a better time to make your voice heard – and we’re here to help master the art of podcasting with step-by-step guides.
Get the new chapters sent directly to your inbox, as soon as they release.
We follow strict no-spam policy. Your information will not be sold.
Consideration #1: Plan your episode. 
So, how do you record a podcast? It all starts with planning. The best way to master how to record for a podcast that offers value to listeners is by preparing for it.
Yea, yea…we know you’re likely eager to go. But you’re better placed to deliver compelling content by following a plan of action. A few minutes of planning can make a big difference to the quality of your business podcast.
And while recording an episode on the fly may work for some podcasters, it is a high-risk approach—especially if you’re new to B2B podcasting. To quote Abraham Lincoln, “Give me six hours to chop down a tree, and I will spend the first four sharpening the axe.”
Here’s how to plan for your podcast recording—whether you’re recording locally or remotely.
- What are you going to talk about? Capturing the highest quality audio won’t matter when listeners don’t care about the show’s content. For more on creating compelling content, kindly check out previous lessons on finding your podcast niche and mastering podcast storytelling.
- Prepare an outline that’ll act as a road map for what you want to touch on. This includes discussion points or questions for your guest. But don’t obsess over the details. Go light and leave some room for spontaneity. This ensures you cover everything you need for a value-packed episode—while still sounding natural, free-flowing, and personable.
- Consider the duration of your episode (more on this below).
- Get in the right headspace. Take deep breaths, feel comfortable, and get in the zone. This helps you project an air of confidence and fun, which is attractive to listeners. Another invaluable tip is to warm your vocal cords to help improve your dictation for a near-flawless delivery. Try some tongue twisters, humming, yawning, loosening your jaw, or any other vocal warming technique.
- Prep your guests. Whether you’re holding an interview remotely or in-studio, walk your guests through what to expect. Highlight the episode’s structure, the topic of discussion, and the preferred duration. This helps ensure the conversation flows smoothly while easing any nerves they may have. Learn more about podcast interviewing and how to extract compelling stories from your guests here.
Consideration #2: Environment and Equipment for B2B Podcasting. 
With planning out of the way, the next step to learning how to record for a podcast is calibrating your setup (and your guest’s) to meet your B2B podcasting goals.
Make the following steps a mainstay in your podcast recording sessions, and you’ll be one step closer to capturing studio-quality audio every time:
- Prepare your podcasting equipment. If you followed our course lesson on the Best Equipment for Podcasting, you likely have a setup with the best podcasting mic (+ accessories), headphones, and other hardware for your B2B podcasting needs. Now it’s time to make sure your setup is ready to go. Make sure everything is wired up correctly. You can run a quick audio check to ensure the recording equipment works great.
- Find a quiet location. The output of your podcasting equipment is only as good as the environment you’re recording in. A sub-par environment can compromise all your best efforts. Learn more about acoustic treatments to improve audio quality.
- Are you comfortable? Your comfort level is an important factor that doesn’t get considered nearly enough when it comes to mastering how to record for a podcast. Consider your posture, chair, a glass of water, or whatever makes you comfortable.
You may have control over your in-studio setup—but what if you’re recording remotely? How do you record a podcast from 2 locations to get the best out of your guests?
You have a little more work to do if you’re recording your podcast remotely. Here are some tips that may help:
- Ask your guests to find a quiet, well-isolated location. You can walk them through what an audio-friendly environment would look like. This should be a spot with minimal echoes or reverb.
- Encourage your guests to wear headphones for better audio quality.
- Remind them to clear any potential sources of background noise—including loud appliances and notifications from phones or computer applications.
- Encourage your guests to speak clearly into the microphone before and during the conversation (if necessary).
- Recording remotely means you have to rely on an internet connection. Ask your guest to ensure their connection is stable and good enough to prevent annoying interruptions during the conversation. OR use a software like Riverside.fm that records the audio locally for best quality and then uploads it to their server, from where you can download those audio files.
Consideration #3: Software for Recording Podcasts. 
As we mentioned in the previous “B2B Podcasting Mastered” lesson, podcast recording software ties everything together—from your storytelling to the hardware. It’s the final piece of the puzzle. For this reason, you need to know the best software for your business podcast, which we covered in detail here.
But more importantly, you need to master how to record for a podcast using your software of choice. And because we understand that making sense of technical audio jargon can be a challenge—let alone maneuvering the complex interface that typifies most podcast recording software—we’ll break down the process as simply as possible.
Here’s how to record a podcast and some examples to walk you through the process in different setups:
DISCLAIMER: Due to potential software updates, user interfaces (and hence the walkthroughs we’ll be covering) may appear slightly different.
A. How to Record for a Podcast Directly into Audio Editing Software.
If you’re recording solo or in-studio, setting yourself up is as simple as gearing up and hitting record on your favorite software for recording podcasts. For this guide, we’ll use Audacity—which we ranked as one of the best free podcast recording software.
How Do You Record a Podcast on Audacity?
You can’t go wrong with Audacity. The iconic software for recording podcasts has long been the go-to solution for beginners and pros alike. Part of the reason for this is its short learning curve.
Here’s how to record for a podcast on Audacity.
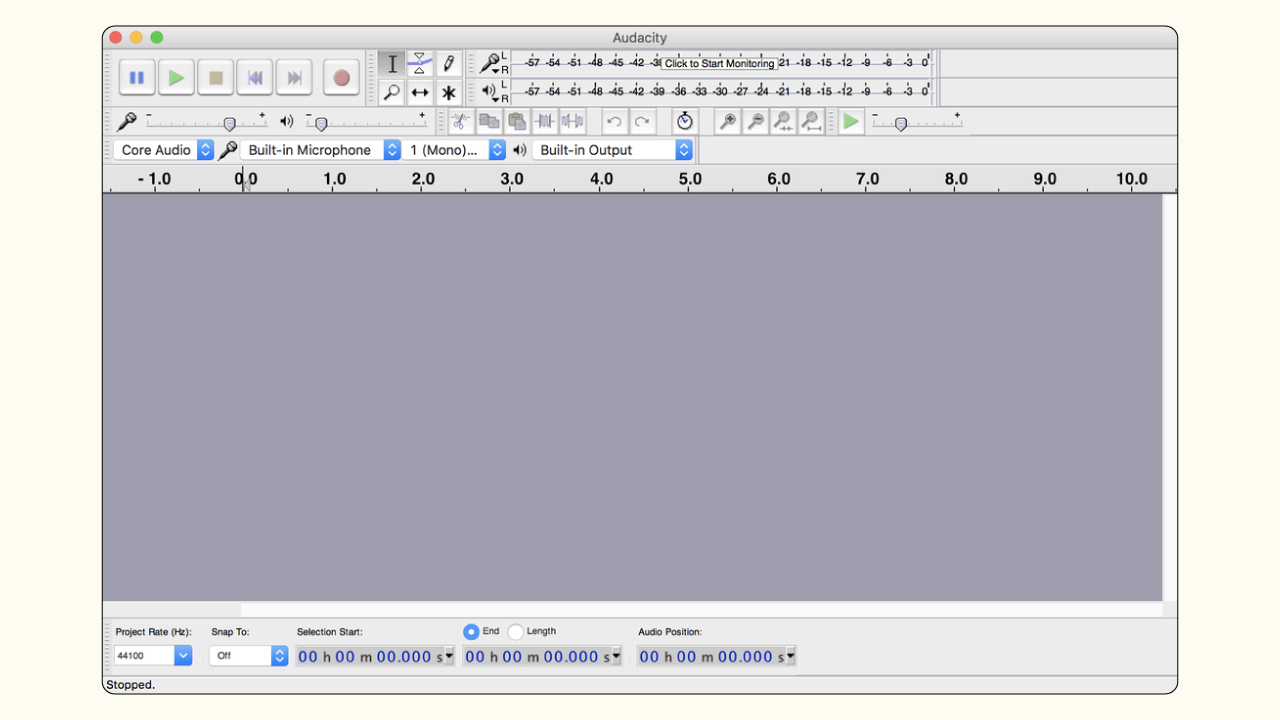
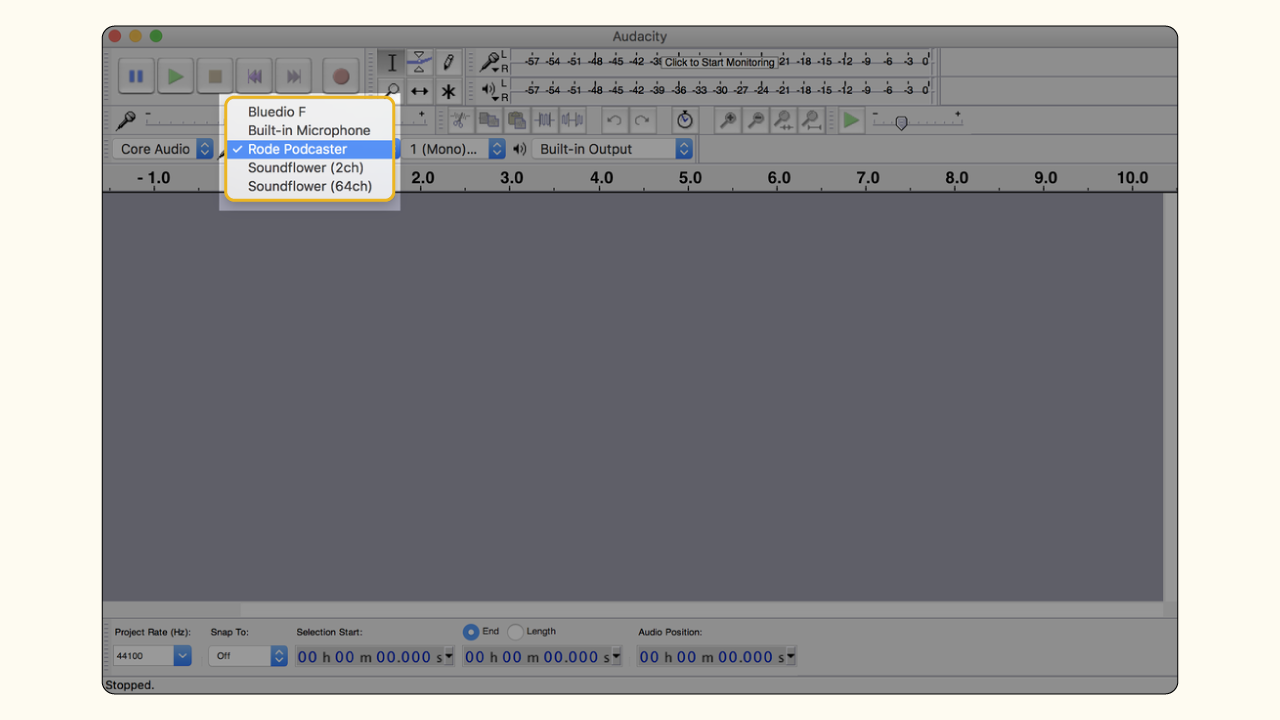
Step 1 – After downloading the podcast recording software and opening it, you likely be looking at the interface below (we know it’s not the prettiest, but it gets the job done):
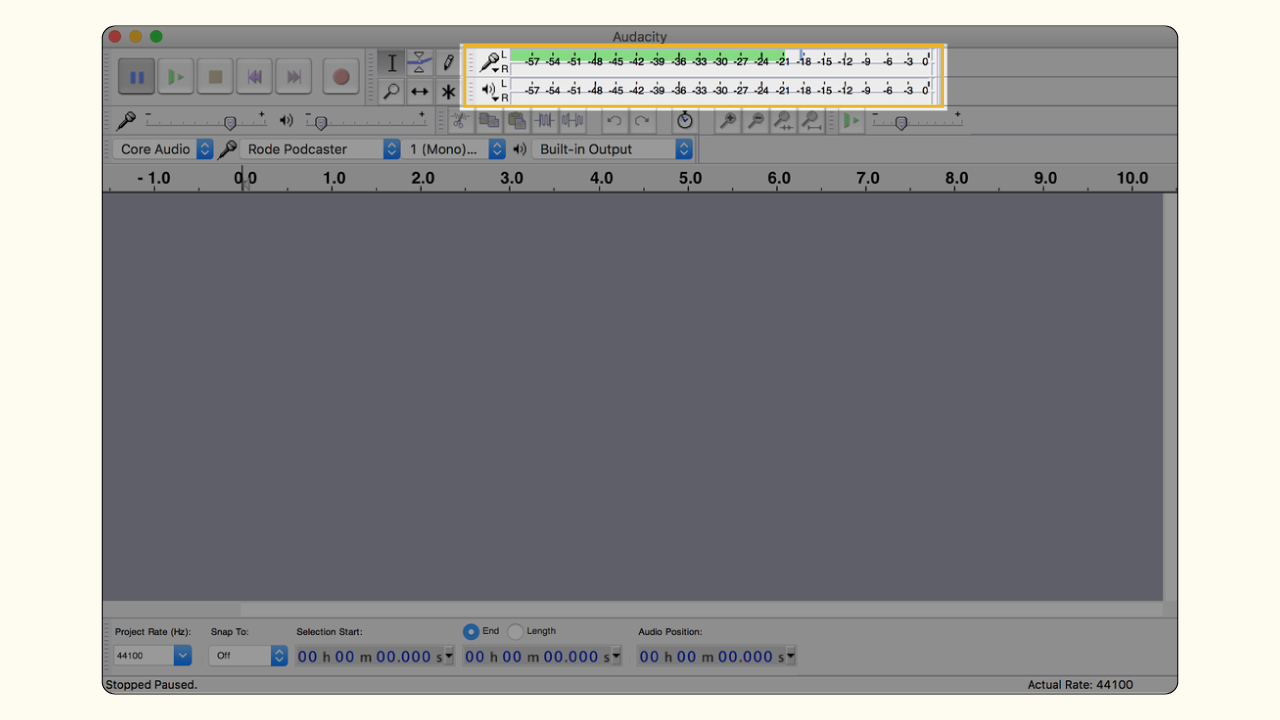
Step 2 – Next, you’ll want to select and set up your microphone. Choose the best podcast microphone from the drop-down menu and monitor the volume levels on the input level bar (shouldn’t go higher than -12dB) before hitting the red record button.
Step 3 – Need a breather? Click the pause button to take a break—and click it again when you’re ready to go. PS: Don’t click the record button again; this will start a new recording rather than pause the ongoing one.
Step 4 – When you’re done recording your awesome podcast, click the stop button to end your recording. And that’s it! That’s how to record for a podcast on Audacity. Easy, right? Now simply export your recording. Go to File > Export Audio and configure the metadata before saving your new podcast episode.
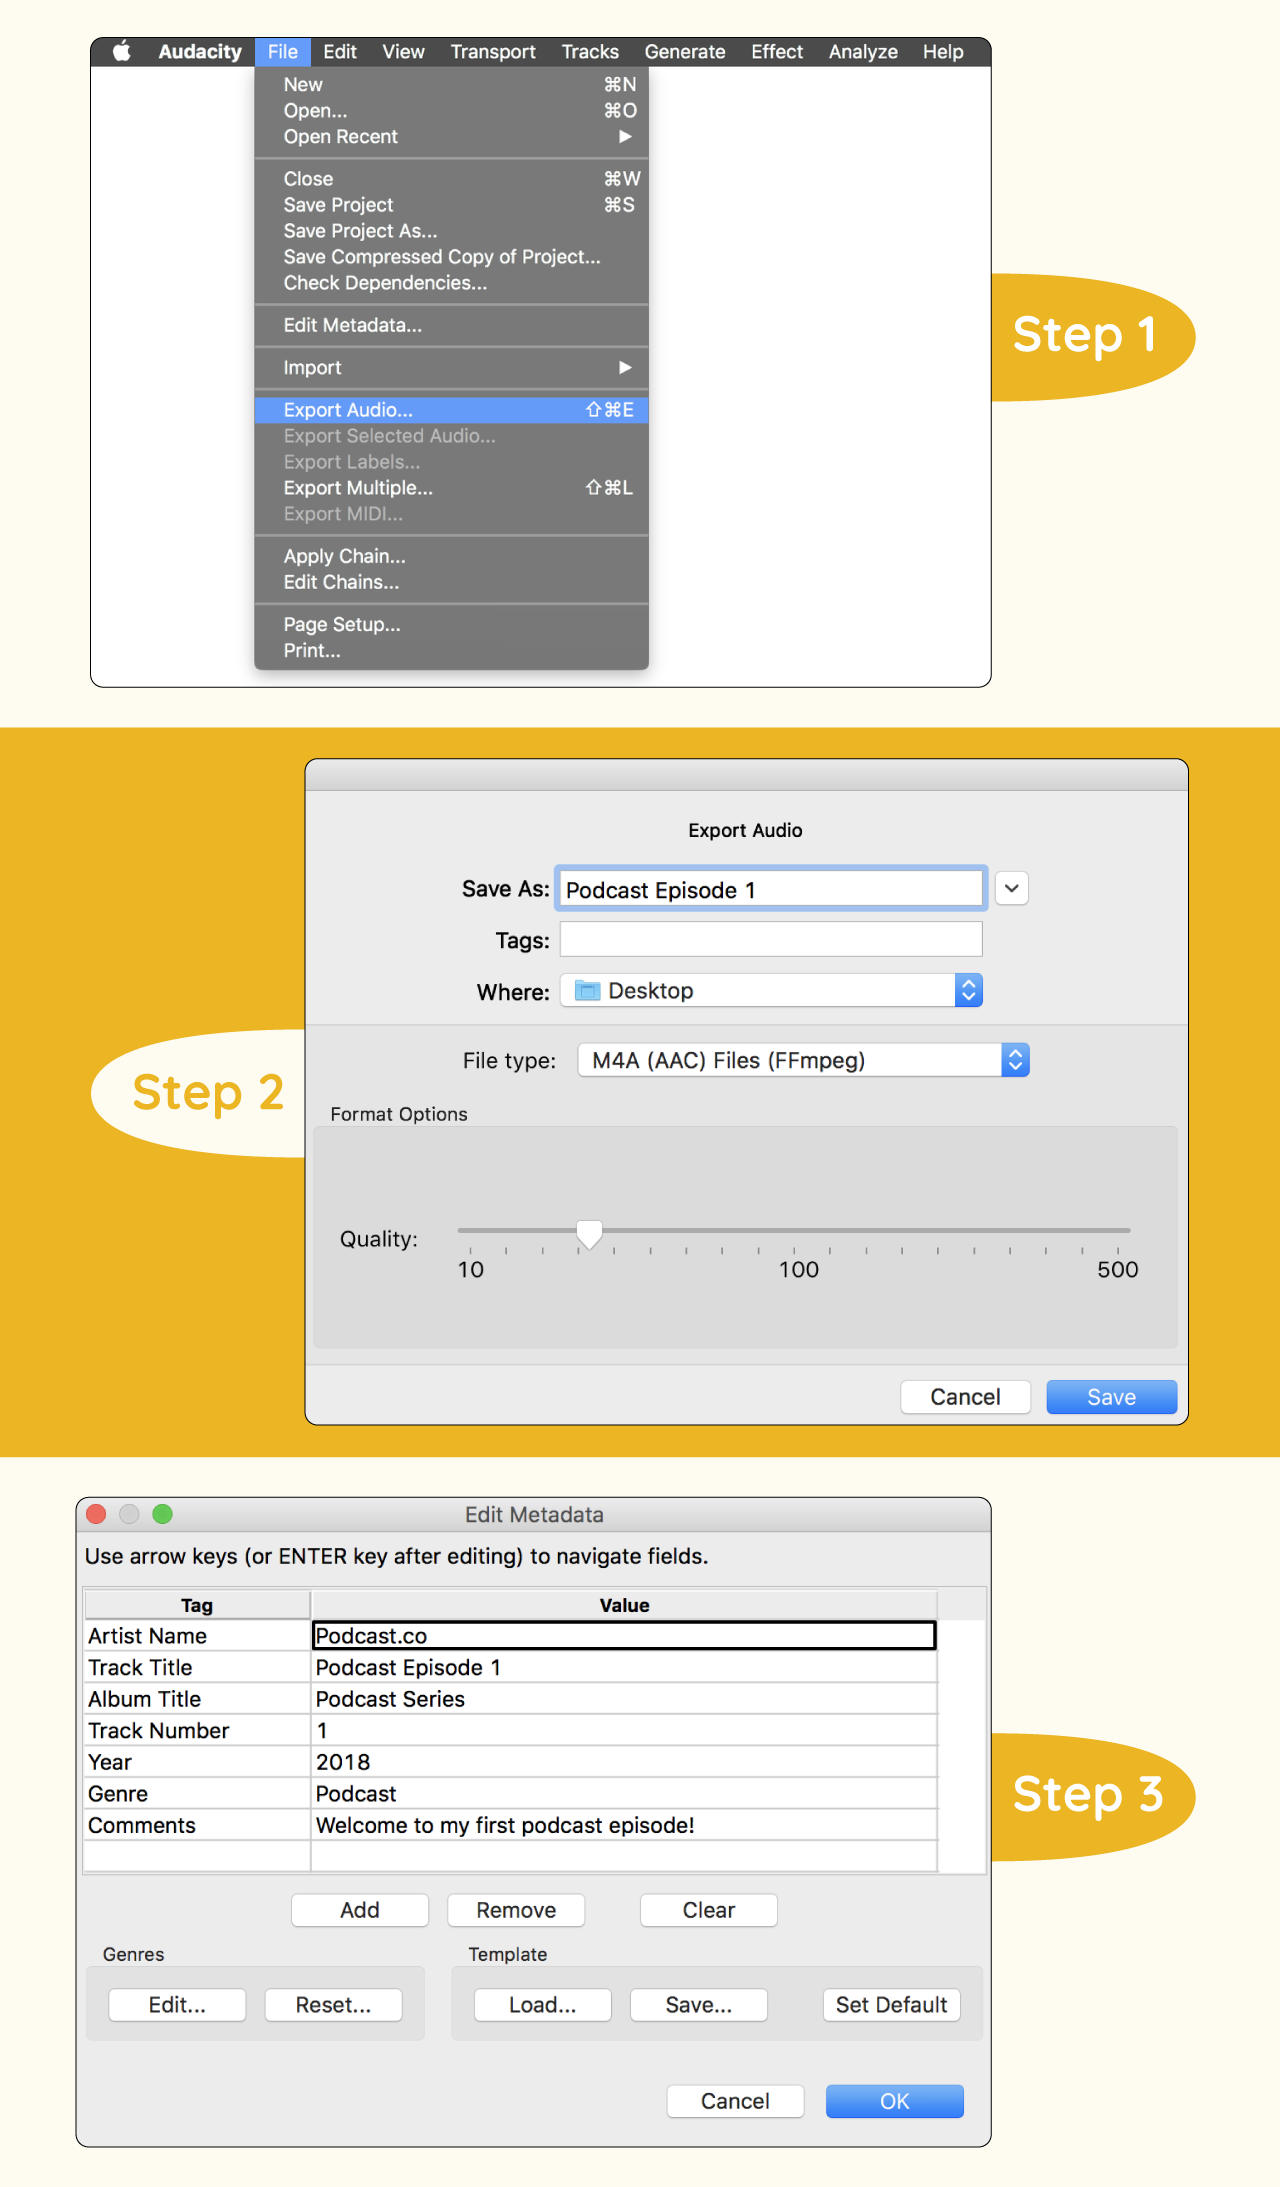
Step 5 – Depending on the file type you choose, you may need to download some encoders. For M4A (AAC) files, you need to install the FFmpeg library—and LAMA encoder for MP3 exports.
B. How to Record a Podcast Remotely.

Recording from the same location is straightforward (more or less). It gets more complicated when you try figuring out how to record a podcast from 2 locations.
So, how do you record a podcast remotely? Suppose your business podcast features a co-host who is miles away or call-in guests. In that case, you have two options: You can record a double ender or use specialized software for recording podcasts remotely.
For a double-ender, both parties (you and the guest/co-host) record audio locally. Or in other words, both ends of the conversation are recorded separately on the respective speaker’s setup. The two audio files are then stitched together in post-production. This helps navigate the risk of audio glitches, call-dropping, or other internet-phone issues.
However, recording a traditional double-ender means each party should have a setup (hardware + software) in place to capture their audio.
An alternative is using a remote podcast recording platform that eliminates the need for individual recording software installed on each speaker’s computer. This often relies on a stable internet connection. And since few listeners are willing to put up with grainy audio, you need the best software for recording podcasts remotely. Our pick for this category is Riverside.
How Do You Record a Podcast on Riverside?
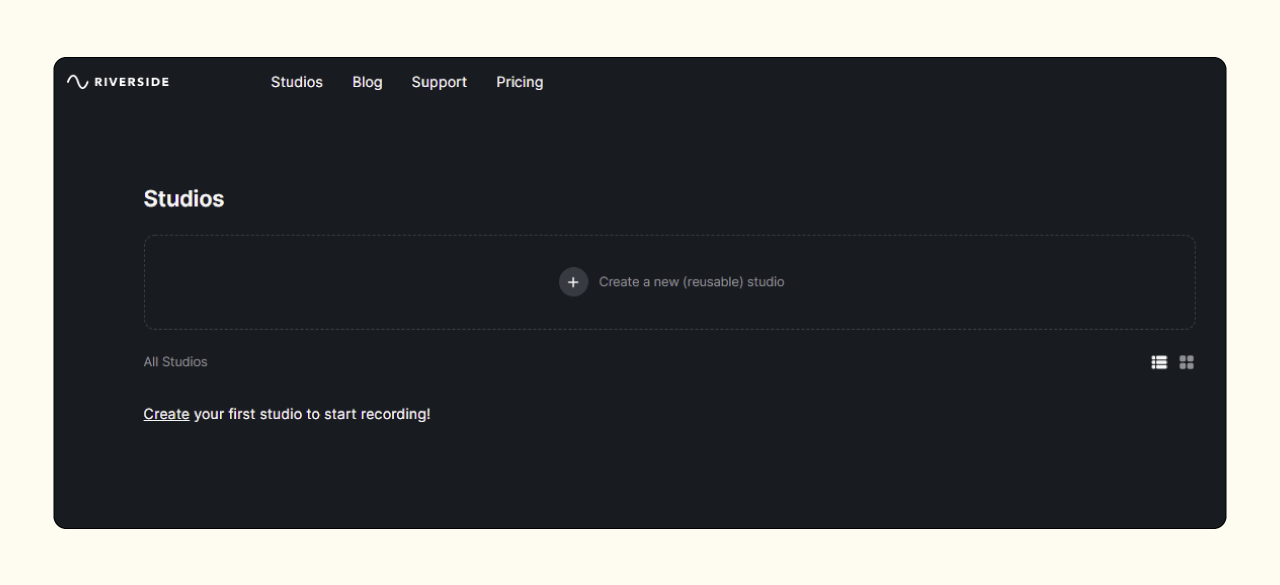
Riverside is an all-in-one solution for anyone looking to master how to record a podcast remotely. You can learn more about why we rank the platform highly here. For now, here’s how to record a podcast from 2 locations on Riverside:Step 1 – Log in to the Riverside dashboard and click on the “Create a new (reusable) studio” button.
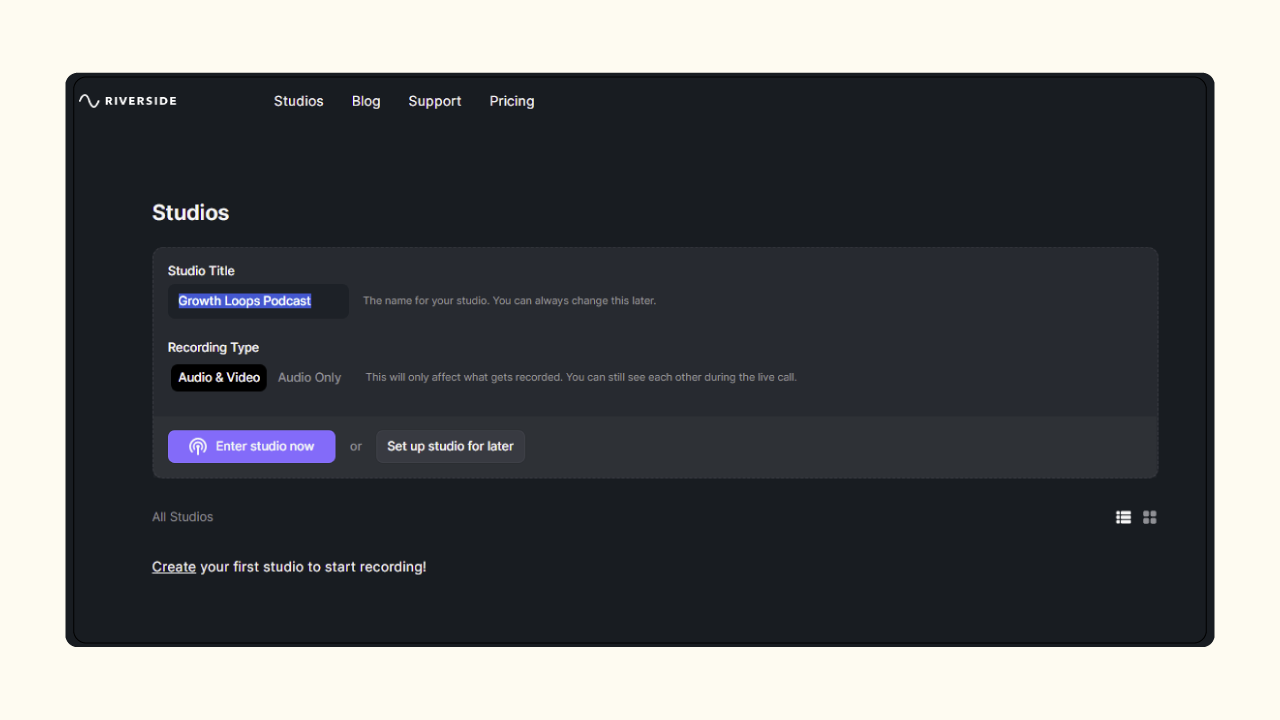
Step 2 – In the window that appears, enter your “Studio Title” and then pick the type of recording you want (audio or audio + video) before entering your studio.
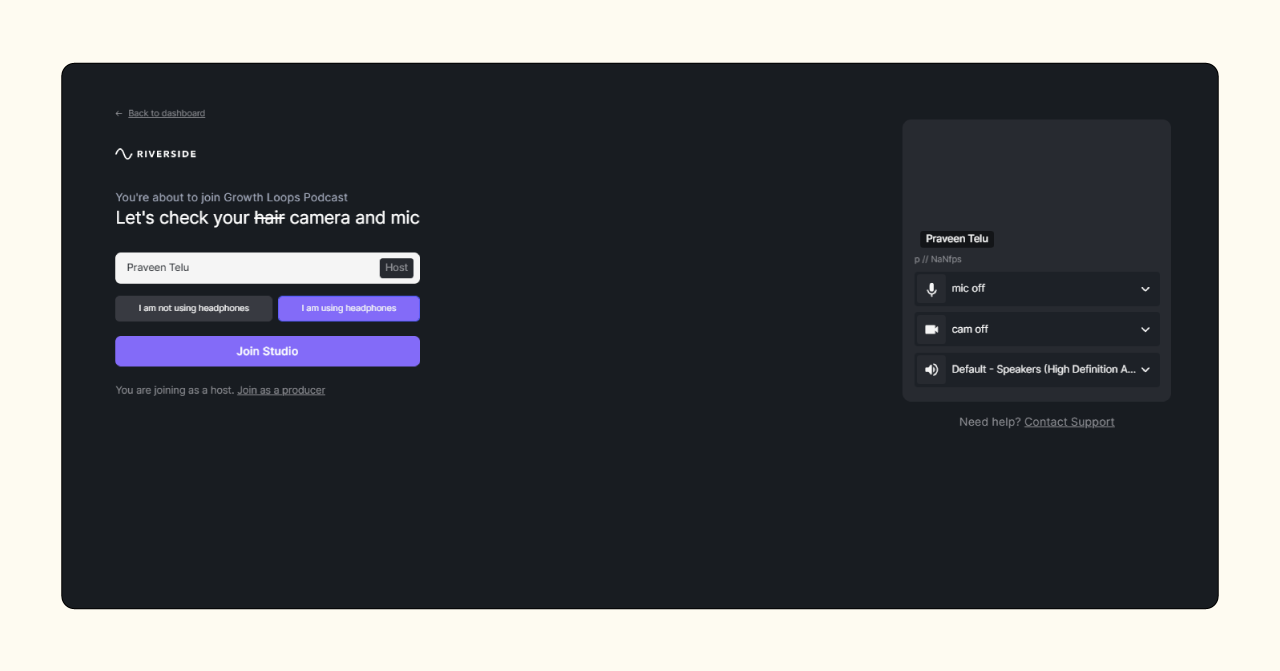
Step 3 – You’ll then be asked to configure your setup before joining the recording. Make sure you pick the right input (mic) and output (speaker) devices from the drop-down menu on the right.
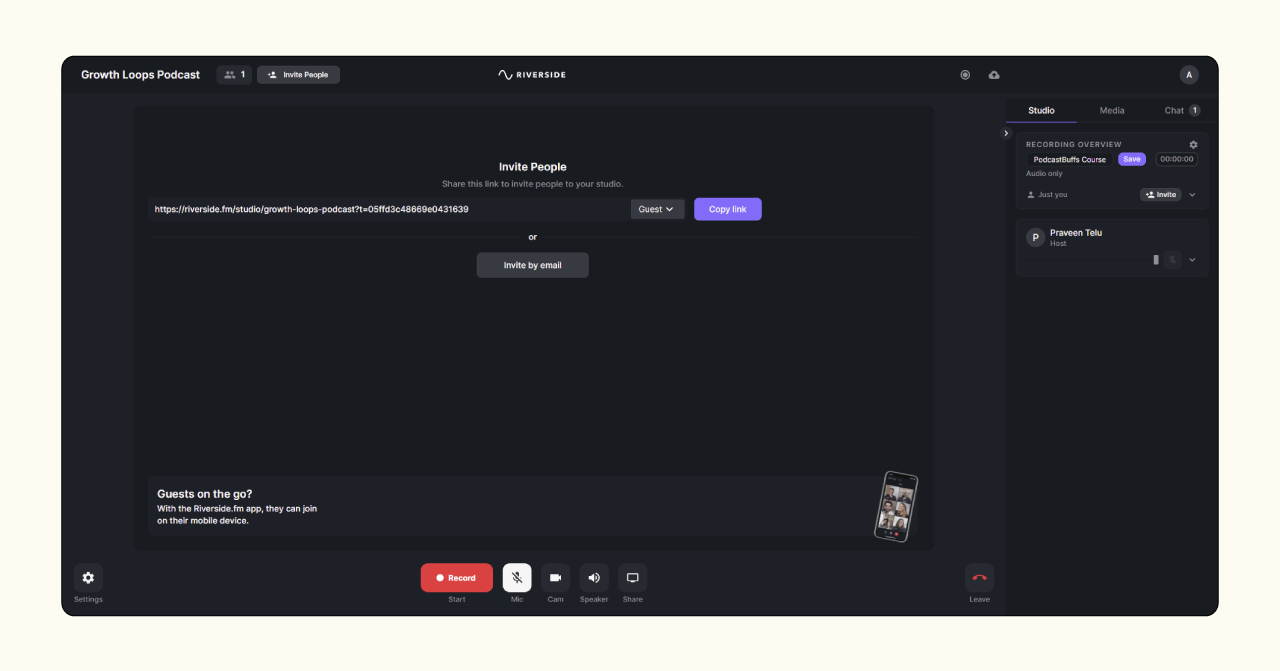
Step 4 – Next is a ‘waiting room’ where you can send an invite link to each participant. When everyone is ready, click the record button to start the session and hit stop when you’re done. The platform will record everyone’s audio track in WAV 48 kHz 16-bit format (great for audio quality). Wait for the guests’ audio files to finish uploading before downloading the tracks separately for post-production.
Step 5 – You can sign up for free to try out Riverside for yourself if you wish to learn more about how to record a podcast remotely using the platform.
C. How to Record for a Podcast Via Video Conferencing Software.
Back to the earlier question: How do you record a podcast remotely? We’ve seen how to record a podcast from 2 locations using Riverside. That’s one way to go about it. The other way is using a video conferencing software for recording podcasts – Skype, Microsoft Teams, Zoom, Webex Meetings, Google Meet, etc.
In this section, we’ll walk you through how to record a podcast on Zoom. Why? Well, Zoom is popular, and it outputs decent audio for video conferencing software. And we’ll show you how to get even better-quality audio from the platform.
How to Record a Podcast on Zoom?
While Zoom is not the best software for recording podcasts remotely, many podcasters turn to the video conferring platform due to its familiarity. After all, you’ve likely used Zoom for a virtual get-together with friends or a work meeting at one time or another, right? So why not use it to record a podcast?
Here’s how to record a podcast on Zoom:
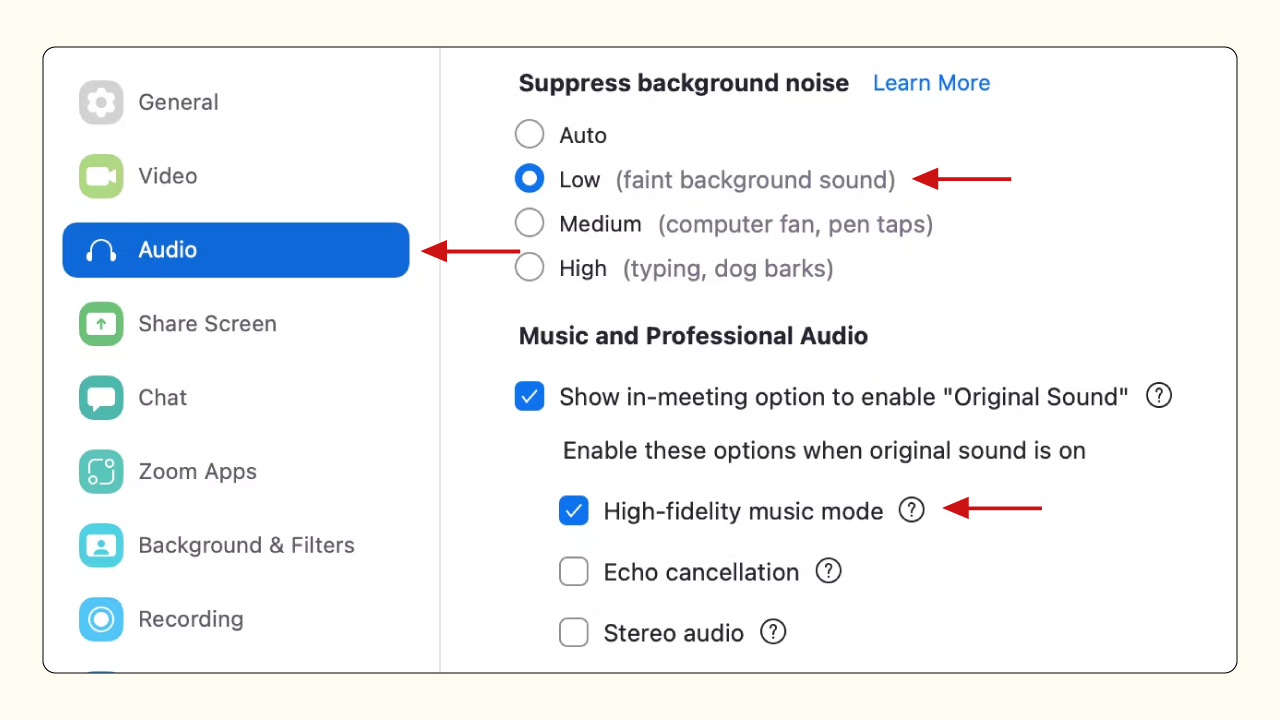
Step 1 – Before anything else, we suggest you configure your settings to capture the best quality audio. The official Zoom blog recommends two main tips for podcasters. First, click the “Audio” tab under the Settings gear icon. Ensure your mic is listed and selected.
And assuming you’re recording in a quiet environment using our recommended equipment, select “Low” under the Suppress Background Noise category and then enable “Original Sound” with “High-Fidelity Music Mode” in the next category.
Step 2 – For the second audio optimization configuration, scroll down to the “Recording” tab and toggle on “Record a separate audio file of each participant.” This makes editing a lot easier and more efficient.

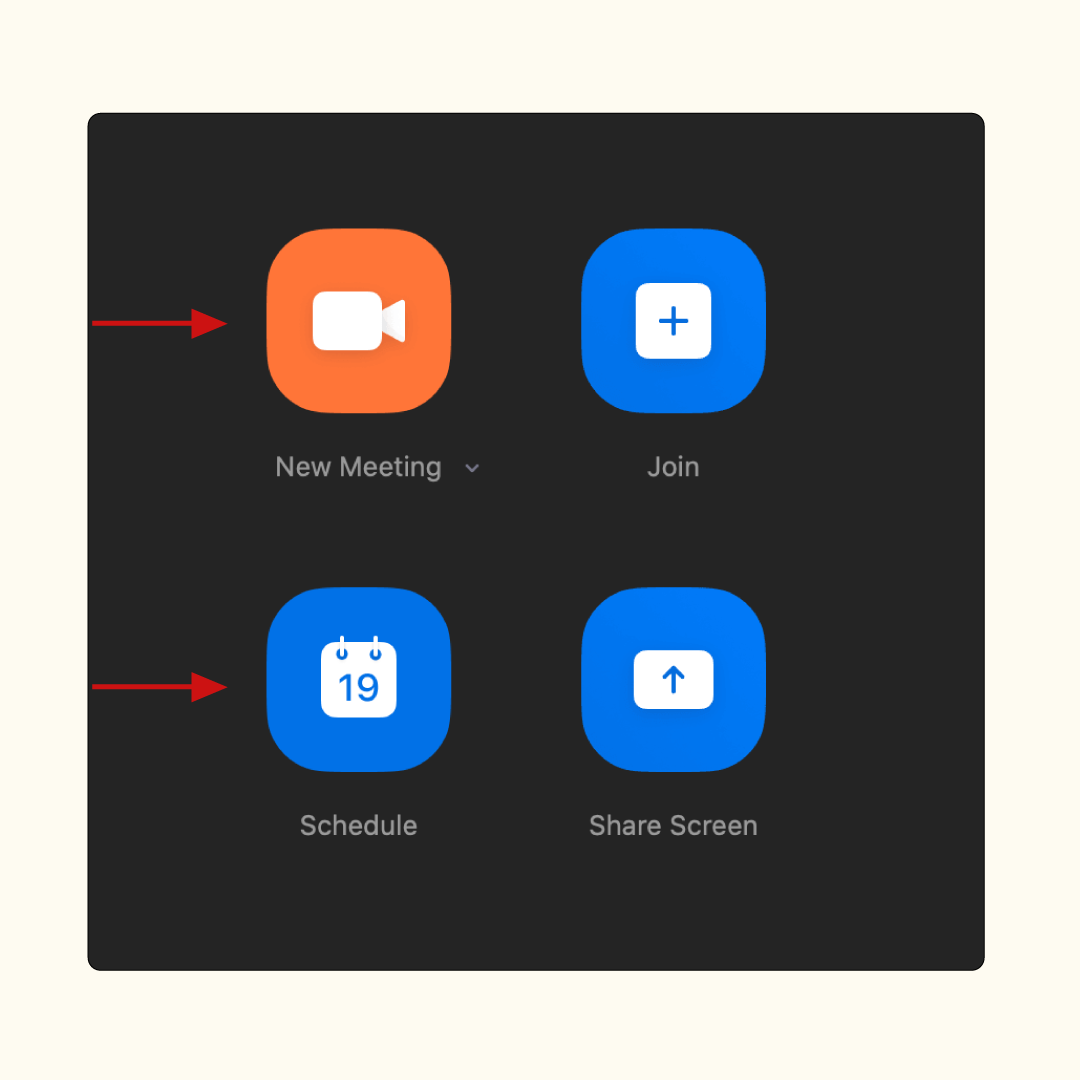
Step 3 – With those two settings out of the way, create a “New Meeting” or “Schedule” one for later. You’ll be prompted to configure your equipment. Select your external mic and speaker before testing their sound quality.
Step 4 – When you enter the call screen, click the “Participants” icon at the bottom of the dashboard. This allows you to generate and send out invite links.

Step 5 – After your guests have joined the meeting and you’re all set to go, click the record button. And remember to turn on the “Original sound” button at the upper left corner of your meeting dashboard.

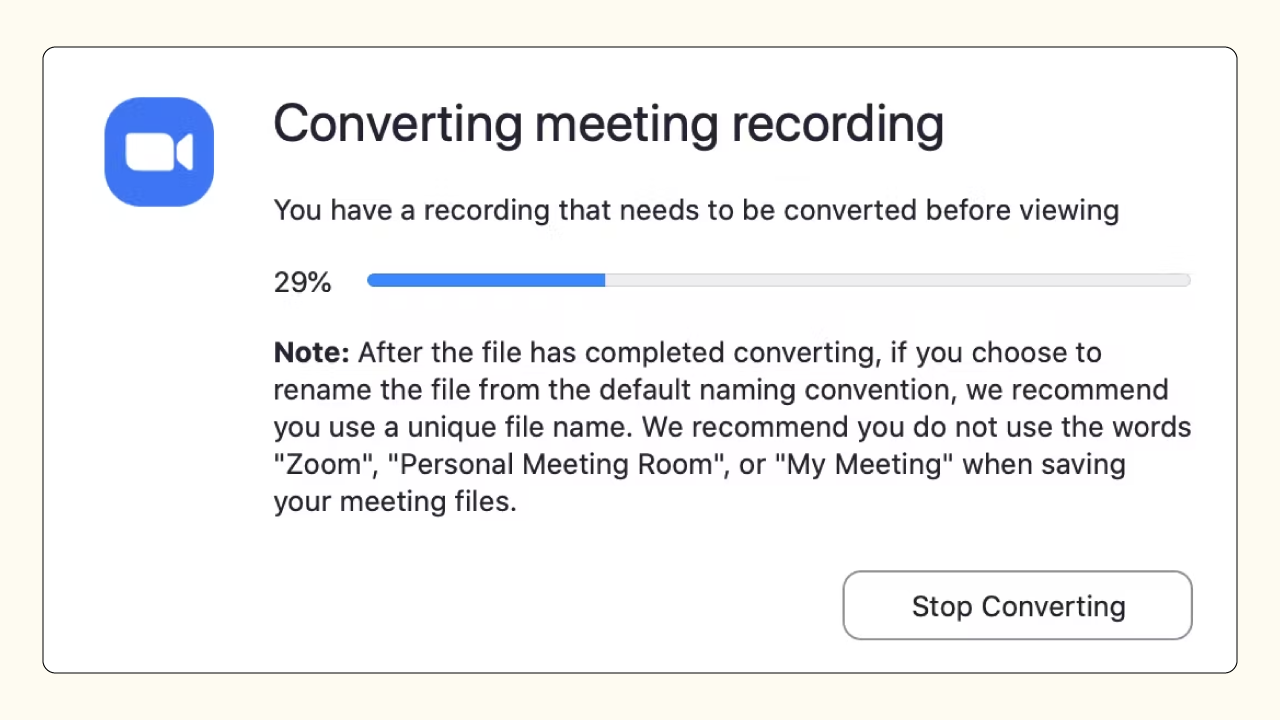
Step 6 – Your new podcast episode will automatically download when you stop the recording.
Step 7 – You can enable automated audio transcripts for your meetings if you have a paid Zoom account. Transcripts come in handy for show notes and repurposing content. Enable this by navigating to Settings > Recording > Advanced cloud recording settings.
D. How to Record a Podcast on iPhone or Android Phone?

How do you record a podcast on the go? Maybe it’s an impromptu interview, or you didn’t want to move around with your bulky podcast recording equipment. Smartphones are an understandably popular way to record podcast audio—and with their accessibility, it’s easy to see why.
We’ll mention now that recording a podcast on an iPhone won’t give you studio-quality audio. But when this is the most logical option, you might as well get it right. Start by scrolling to the earlier section on “Environment and Equipment for Podcasting.” Once that’s established, find the best podcast recording software for you and start recording.
This step-by-step guide will show you how to record a podcast on iPhone using GarageBand.
How to Record a Podcast on GarageBand?
We’ll be using GarageBand as an example of how to record a podcast on iPhone for 3 reasons: It’s free, user-friendly, and the audio output is decent enough for most podcasters.
PS: GarageBand for macOS is a bit more complex than the iOS mobile app we’ll be highlighting below.
Now, here’s how to record great audio using GarageBand on your iPhone:
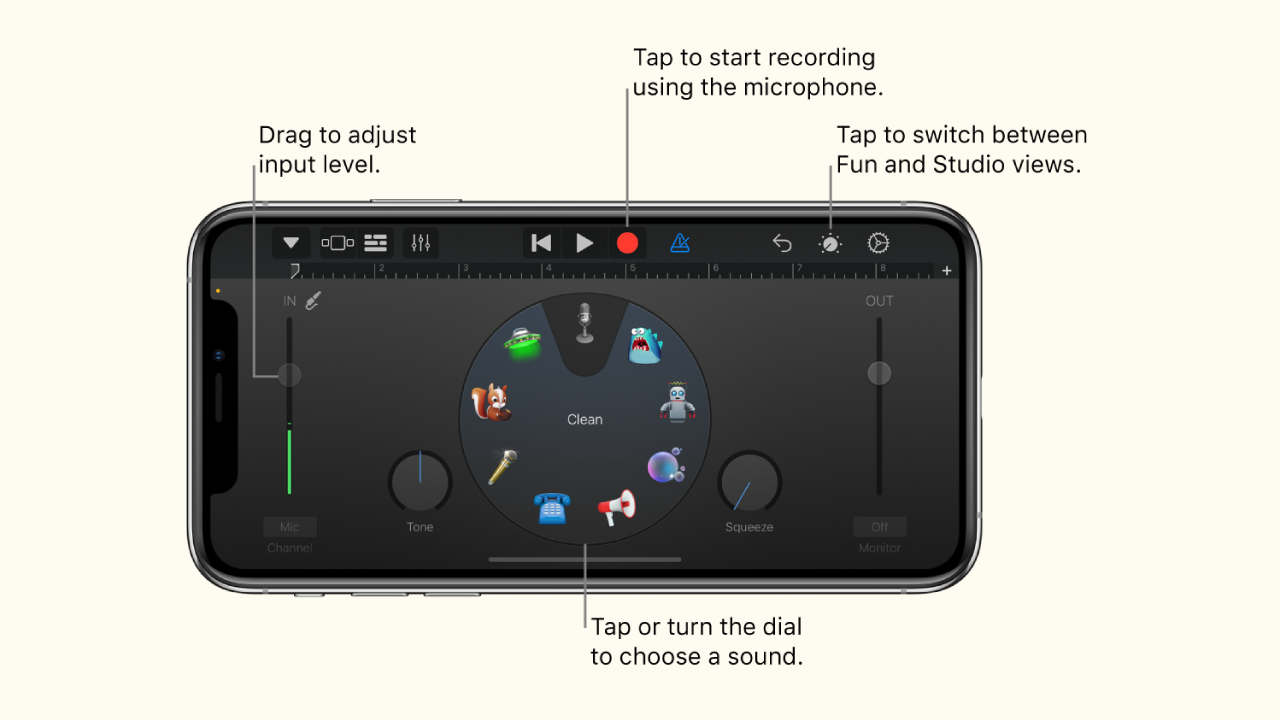
Step 1 – Open GarageBand on your iPad or iPhone and tap on “Create New Project.” In the window that follows, ensure you select “Tracks” on the top bar, then click on the “Voice” icon.

Step 2 – Before hitting record, you’ll want to configure a few things. First up, tap the “+” sign on the upper left corner of your screen. For audio recordings—rather than musical compositions—pick “8 Bars” and then turn on “Automatic.”
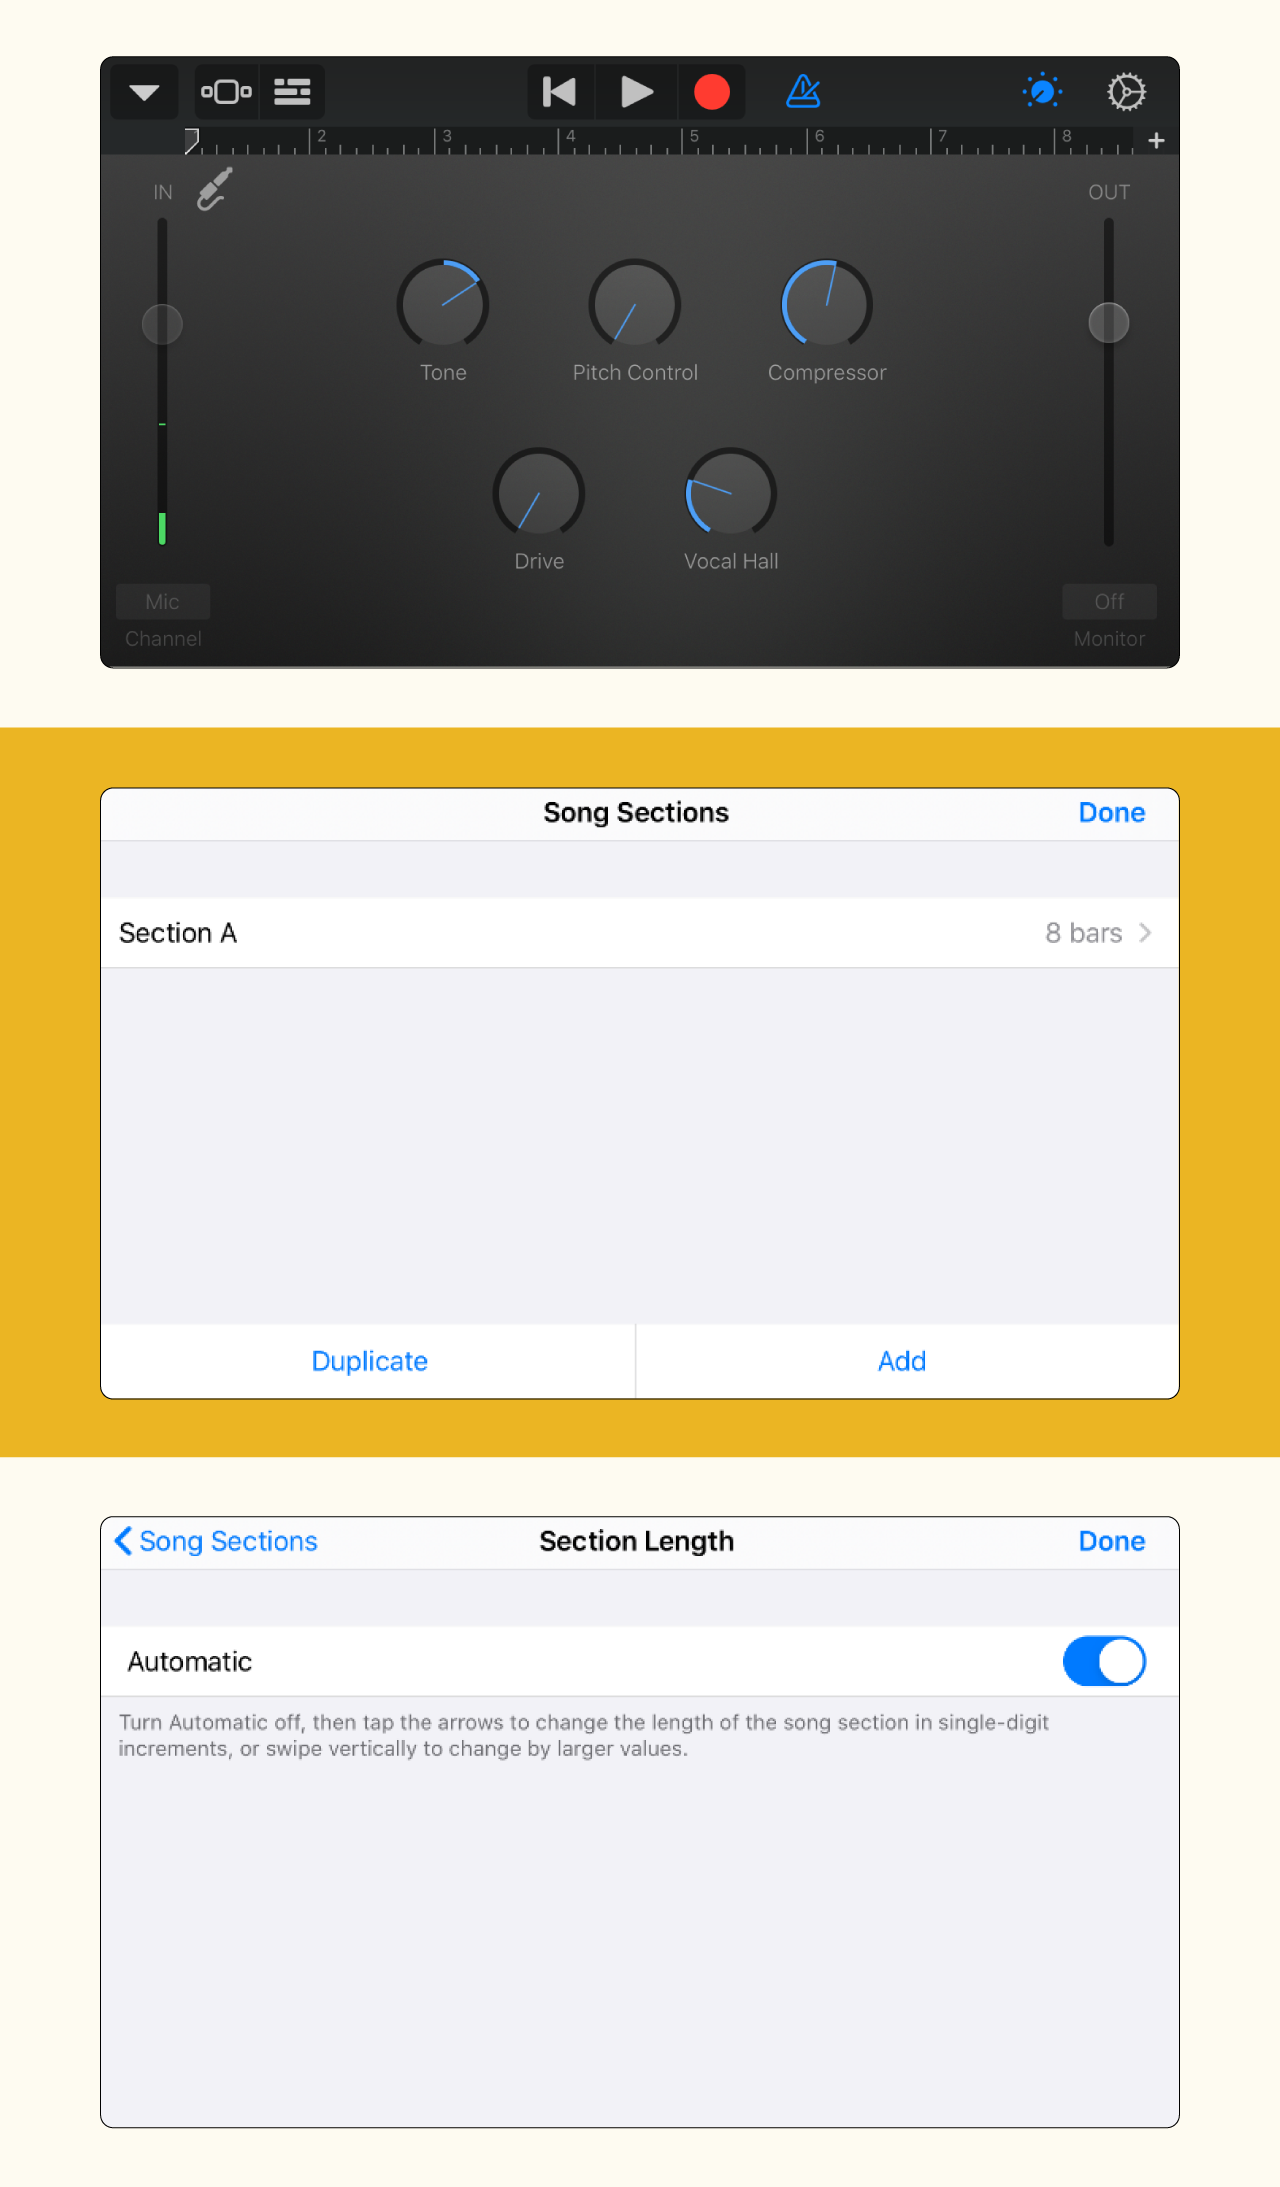
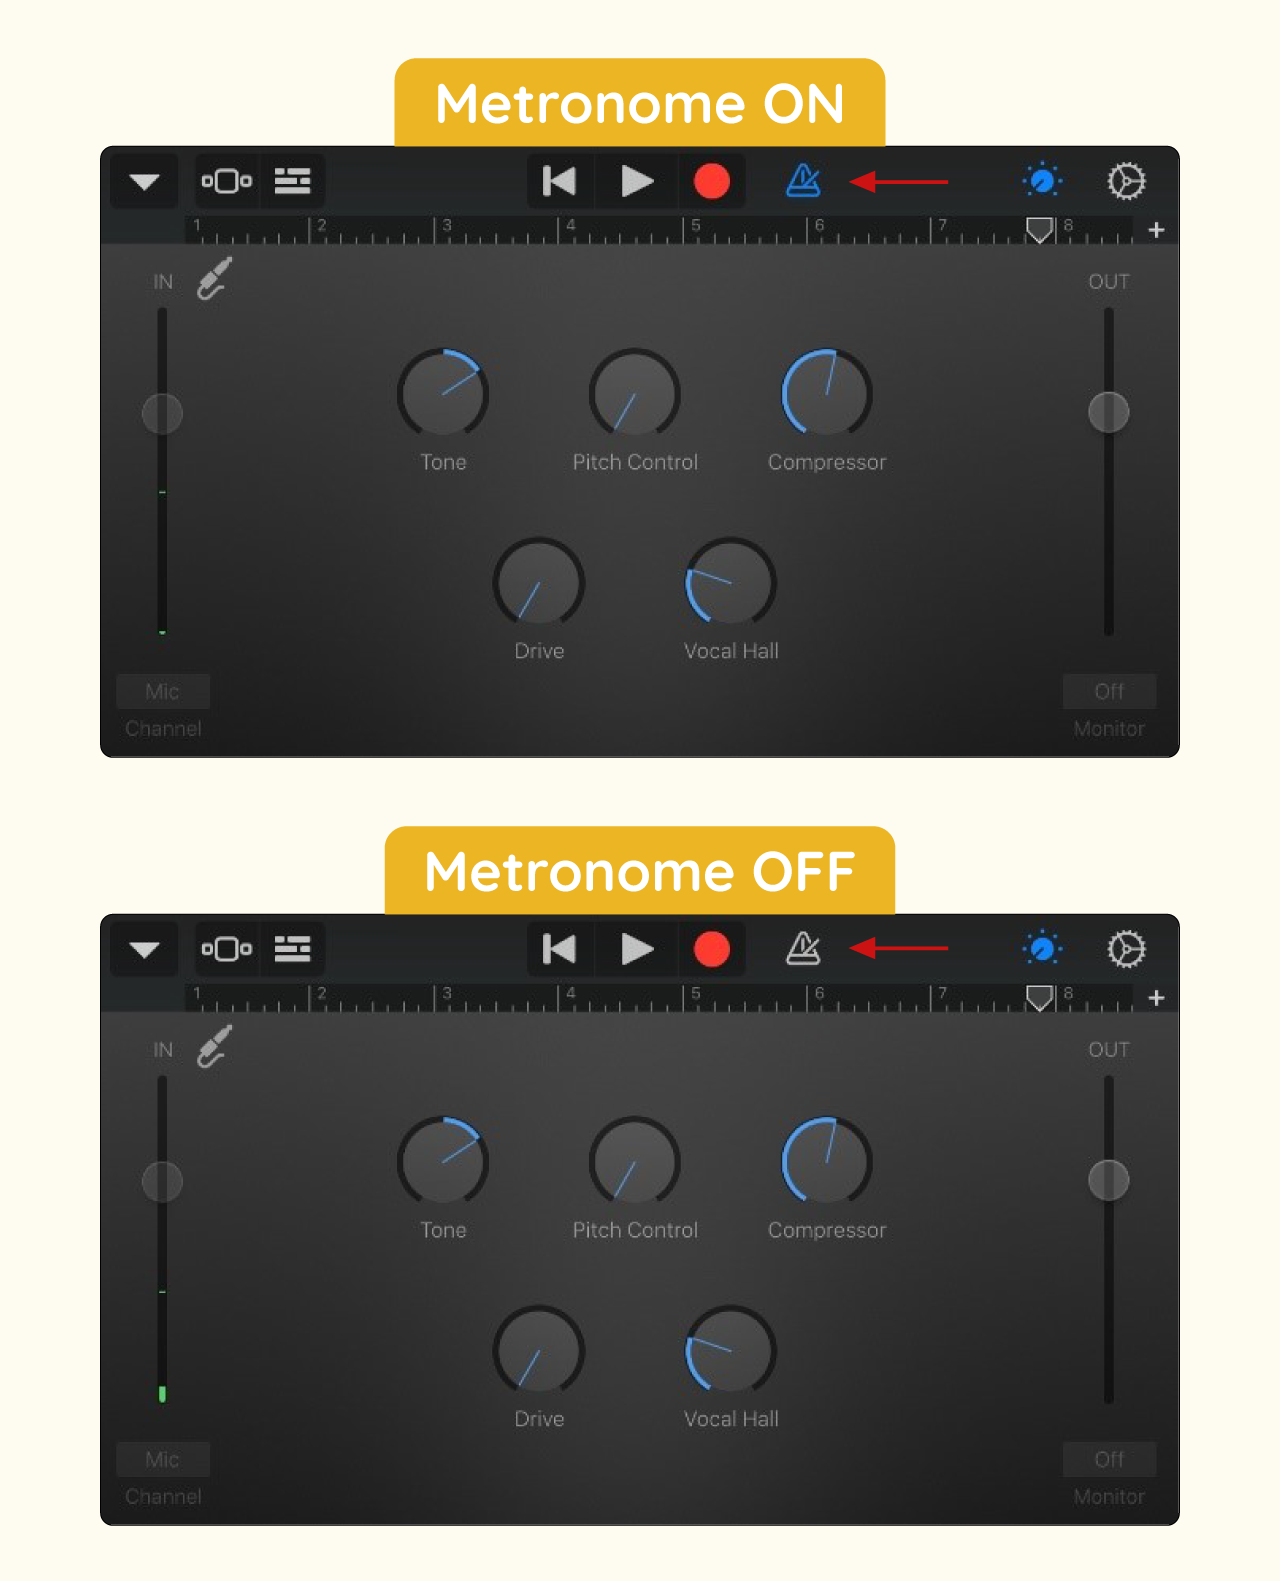
Step 3 – The next setting to configure is the metronome (i.e., the icon on the immediate right side of the red record button). This feature is meant to help you record in time by playing a steady beat—but you likely won’t need it when learning how to record a podcast on iPhone. So you can turn it off.
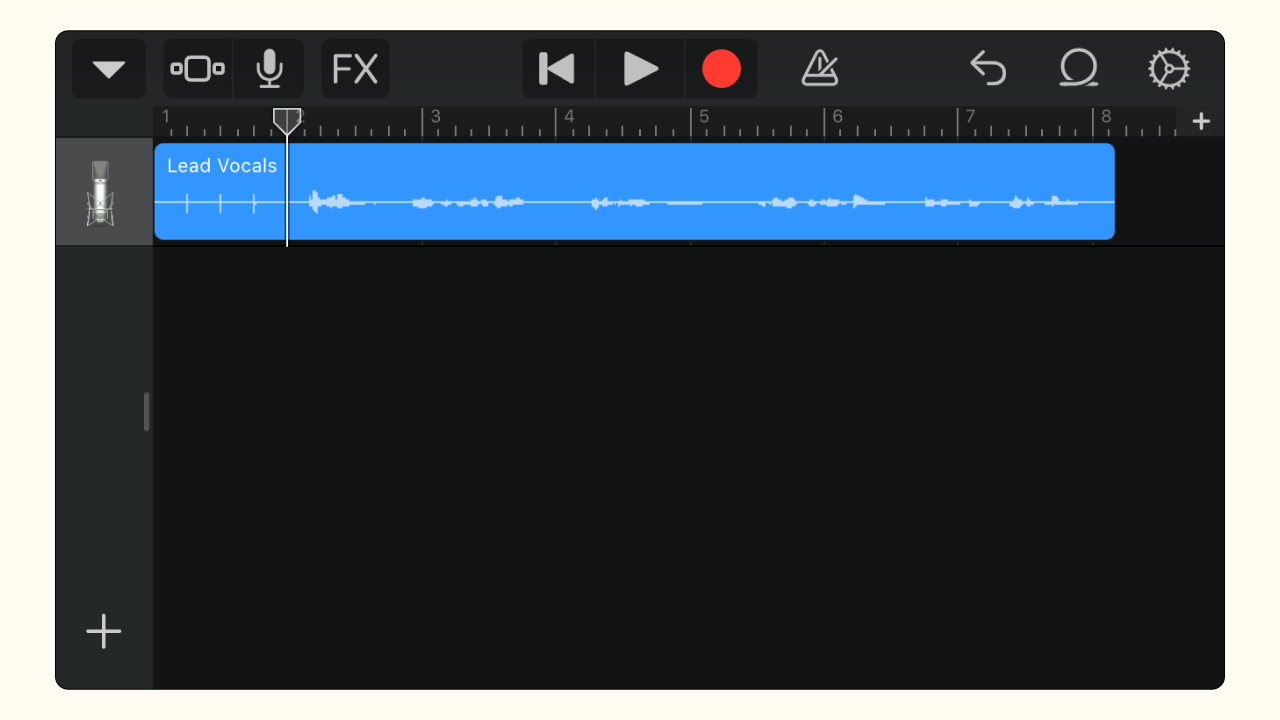
Step 4 – You’re all set to start recording. Press the record button and deliver your content. Tap the same button when done and save your file.
Bonus Tips & Tricks on How to Record for a Podcast Like a Pro.
Mastering how to record for a podcast takes some practice. But what if you could skip a lot of the trial-and-error?
To help you refine your podcast recording quickly, we’ve put together a list of actionable tips and tricks you can implement in your next episode. Whether you’re a beginner or pro, you might find a nugget of wisdom that may take your audio quality to the next level.
1. Adopt and Implement Proper Mic Techniques.
Having the best mic for B2B podcasting is not enough. You need to know how to use it for the best results. Here are some tips to consider:
- Optimize microphone positioning. Your mic should ideally be at the same height as your mouth. You’ll also want to monitor the proximity of your mouth to the mic. Find a distance that offers the desired volume level (the closer you are, the louder) and try to keep it consistent throughout the podcast recording. A good rule of thumb is to have your mic 1 foot away from your mouth.
- Learn your mic’s sensitivities and adjust your setup accordingly to brighten up the recording.
- Control your breath (smaller, even breaths) to minimize big gusts of air sneaking into the audio track. And if you need to take a deep breath, move your mouth away from the mic. A pop filter can also help mitigate this.
2. Track Episode Length.
There’s no one-size-fits-all recommendation for episode length in B2B podcasting. So we can’t tell you how long your recording should be. But we can tell you how long most people are willing to listen to a podcast episode. According to Statista, most podcast listeners (34%) consume up to 30 minutes of content on average.
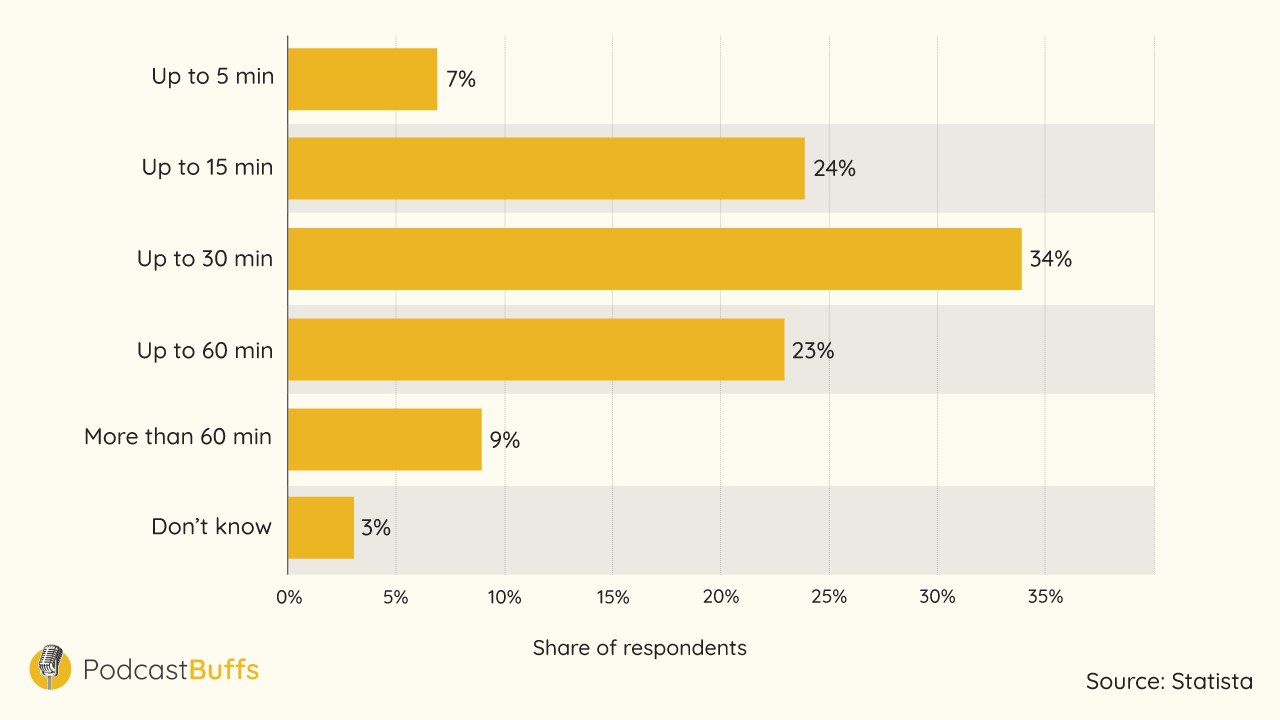
Why does this matter? Your goal as a podcaster is to create valuable audio content that is long enough to fit into your audience’s lives in a meaningful manner—and no longer.
3. Avoid Interruptions During a Conversation.
While you can edit out interruptions later, you can help create a framework for better quality audio by implementing the following strategies during a conversation:
- Mute participants who aren’t speaking. This mitigates the risk of background noises such as coughs or chair adjustments. It’s a simple hack that could significantly impact the quality of your recording.
- Train yourself to stay silent while recording. Interjections such as “uh-huh” or “yea” may signify politeness in normal conversations, but they can be distracting for podcast listeners. Allow another speaker to complete their thought before contributing. You can express your level of engagement using body language, such as a subtle nod.
4. Create a Noise Profile.
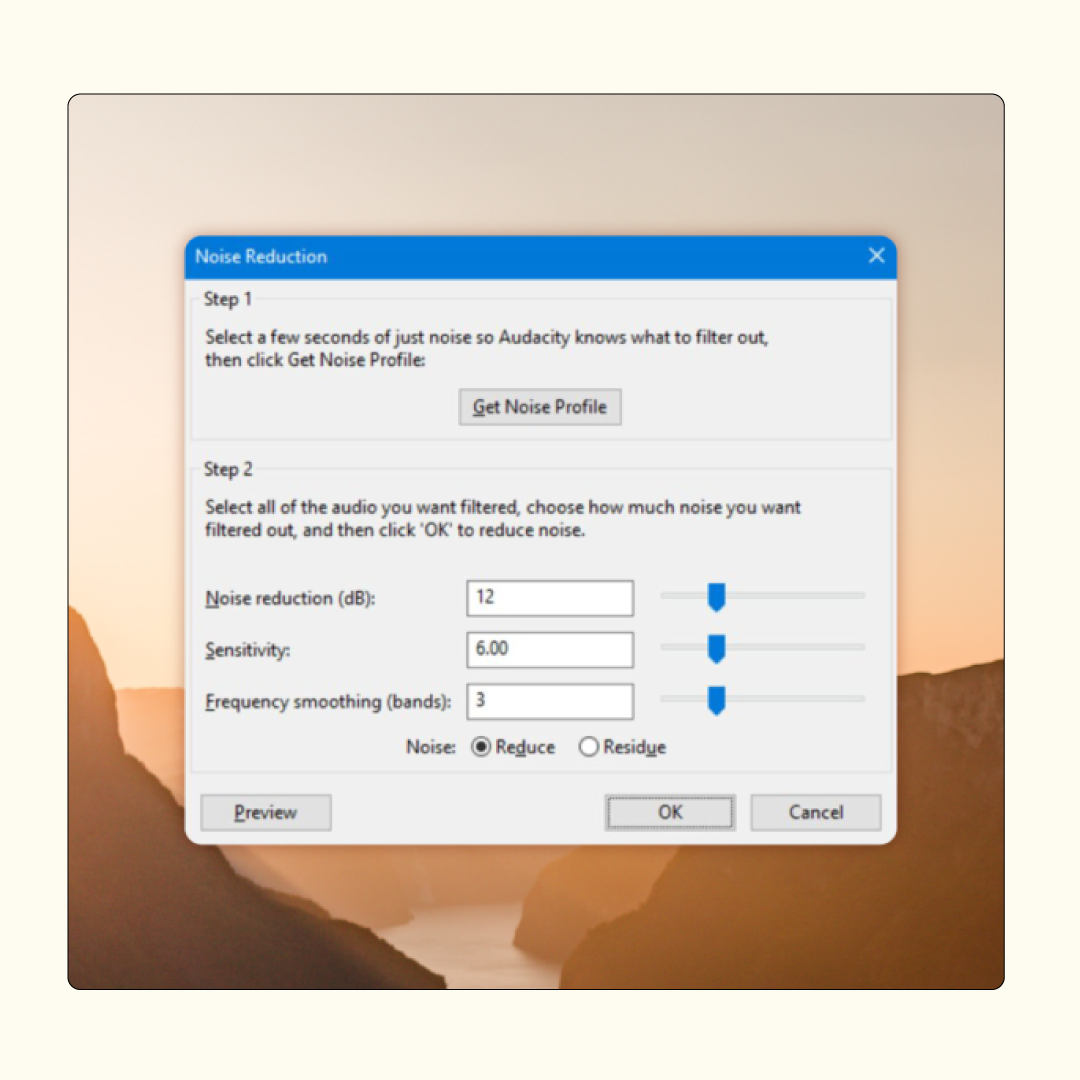
A noise profile is simply a short moment of maximum silence that you record before starting a podcast conversation. It provides a ‘template’ from which you can better identify and get rid of background noise during post-production. Just before you start speaking, ask everyone to be silent for 5 seconds–and use these 5 seconds as your noise profile.
5. Record Each Participant on a Separate Track.
People have different voices and volume levels–not to mention inconsistencies with podcast equipment configurations. To better control individual noise profiles and volume levels, recording each participant on a separate channel is advisable.
The best software for recording podcasts typically have a multi-track recording feature. We discussed how to enable this feature in the earlier section on how to record a podcast on Zoom.
6. Watch Your Volume Levels.

Keep an eye on your volume levels while recording your business podcast. Most software for recording podcasts use a scale of green, yellow, and red. Ideally, you’ll want to stay in the green. But it’s okay to have occasional moments in the yellow zone when you want to emphasize something during the conversation. Steer clear of red to avoid distorted sound.
7. Leave Cue to Track Mistakes.
Despite your best preparations, there’s always a risk of mistakes creeping into the audio. When a mistake inevitably happens, consider leaving in a cue during your conversation to help you (or your editing team) quickly and efficiently track the flaw.
The cue can be anything that leaves an easy-to-identify mark on an audio graph—from a prolonged moment of silence to a high-pitched sound.
8. Take Planned Breaks.
Staying still and talking for a whole hour is not easy—and you don’t have to go through the hassle. It is a great idea to take strategic breaks to stretch your legs, grab a snack, solve an audio issue, or discuss the episode’s direction with your guest.
Ready to Start? You Got This! ????????
There you have it, everything you need to know about how to record for a podcast—both locally and remotely. By now, you should know how to record for a podcast to capture the highest-quality audio. Now go out there and implement what you’ve learned with confidence. Remember, it’s all about planning, getting your setup right, and mastering your software for recording podcasts.
This lesson wraps up Module 3 of the “Podcasting Mastered” course, which leaves you well-positioned to create and record a value-packed episode in the highest quality possible. Next, we’ll cover how to master podcast editing and post-production so you can deliver pro-level audio that your listeners will love.
Don’t know where to begin? Get started with our free B2B Podcasting course.
FREE EMAIL COURSE
B2B Podcasting Mastered
Learn how to launch a revenue generating podcast for your business in just 10 minutes a day, for 2 weeks.